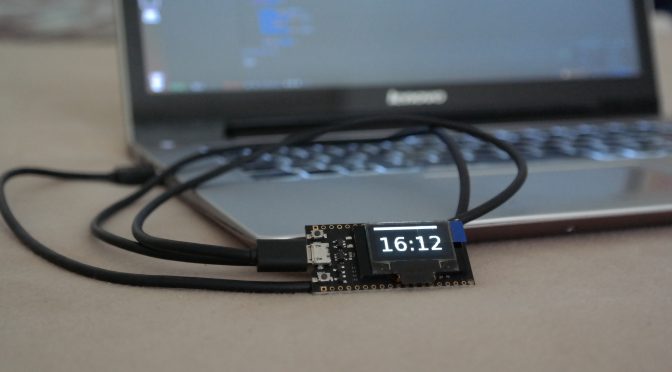
As a first project with my new ESP32 module with OLED display I chose to build OLED clock. I thought I’ll just find some existing code, upload it and it’s done. There are a few such projects for ESP8266 in NodeMCU. So I started with NodeMCU upload.
First I tried NodeMCU binary from https://nodemcu-build.com/ but it was throwing strange binary streams to serial and didn’t respond to any keys. Then I found out it is probably only for ESP8266 so I decided to build esp32-dev version from sources like this:
git clone --branch dev-esp32 --recurse-submodules https://github.com/nodemcu/nodemcu-firmware.git nodemcu-firmware-esp32
cd nodemcu-firmware-esp32/
sudo apt install flex bison
make
make flash
But this was also not working, I was getting following error in loop:
rst:0x1 (POWERON_RESET),boot:0x17 (SPI_FAST_FLASH_BOOT)
configsip: 0, SPIWP:0xee
clk_drv:0x00,q_drv:0x00,d_drv:0x00,cs0_drv:0x00,hd_drv:0x00,wp_drv:0x00
mode:DIO, clock div:1
load:0x3fff0010,len:4
load:0x3fff0014,len:588
load:0x40078000,len:0
load:0x40078000,len:9768
entry 0x400789b8
ets Jun 8 2016 00:22:57
Then I decided to go different way – to build my own app as complete binary with PlatformIO.
PlatformIO
is a IoT IDE built on top of Atom editor:
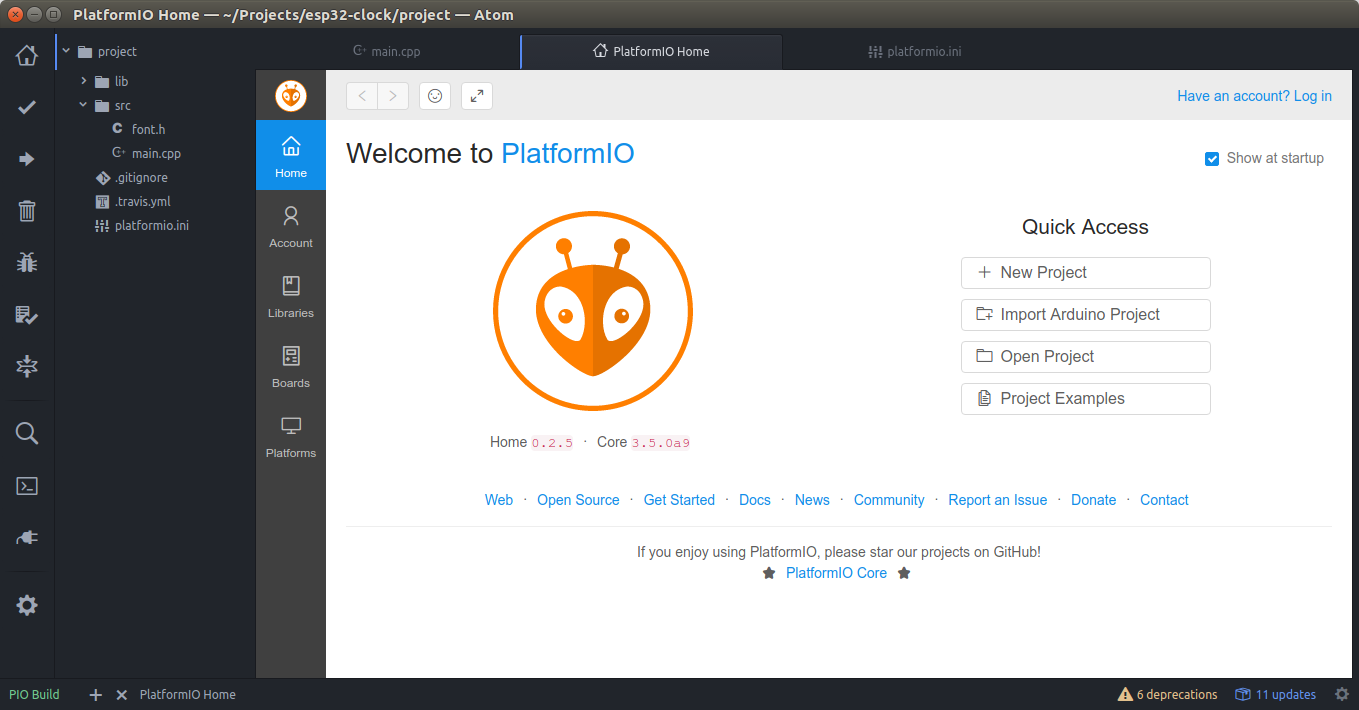 It supports building Arduino projects and Arduino library supports ESP8266 and ESP32 (PlatformIO supported boards).
Starting new project is easy – just choose some ESP32 board
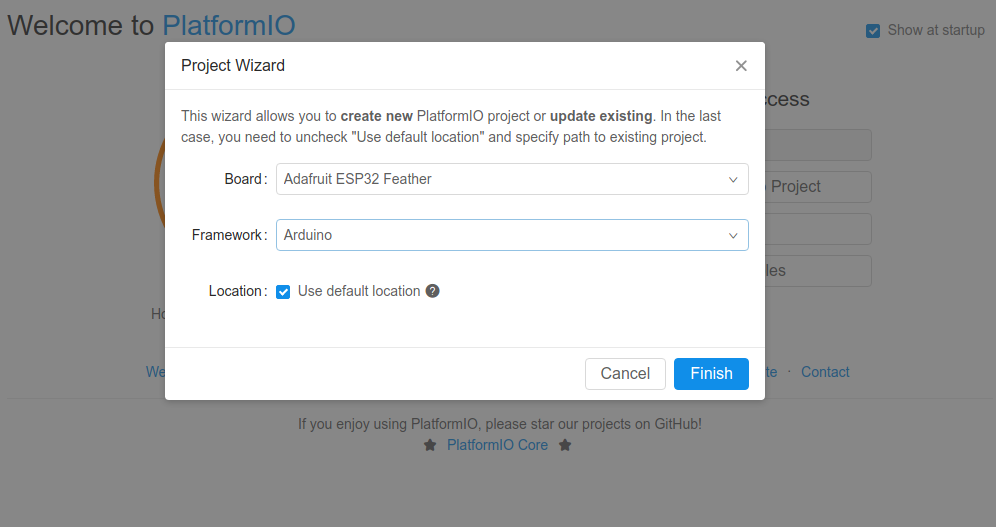 You are thrown into empty project afterwards
![]() Now since I want to use NTP for getting exact time and don’t want to write own client, let’s see if there is a library available:
Now since I want to use NTP for getting exact time and don’t want to write own client, let’s see if there is a library available:
Let’s open Libraries
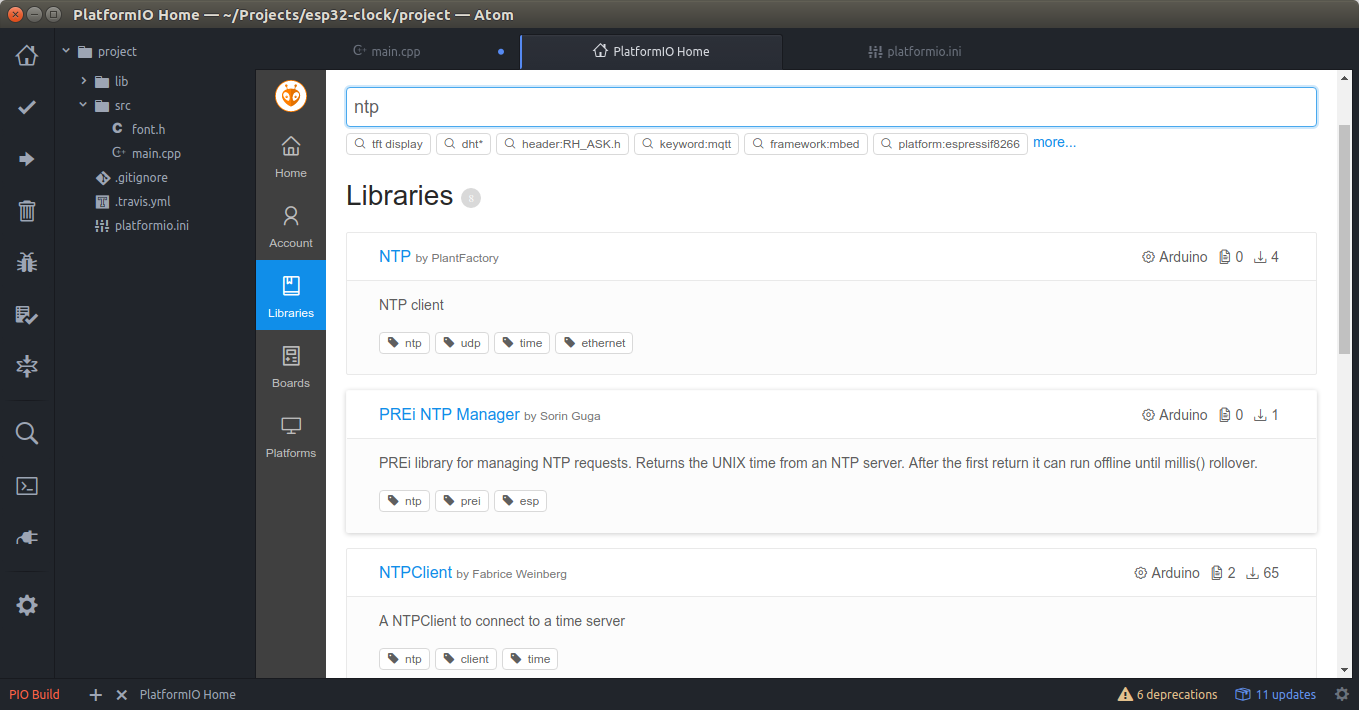 Now search for NTP
OK, let’s try one
 Install it. It contains example code so I can copypaste it into main.cpp. So now I have time source. Next I need display driver. Googling “ESP OLED” gives me this library:
https://github.com/squix78/esp8266-oled-ssd1306
What attracted my attention was, that those screenshots showed exactly the same pictures my device was showing with factory firmware (which I backed up just for case). So I knew it might work. So I installed it as the README says by running
platformio lib install 562
in PlatformIO console.
Then I connected my module via USB and /dev/ttyUSB0 appeared. Next I put together some example code and hit Upload.
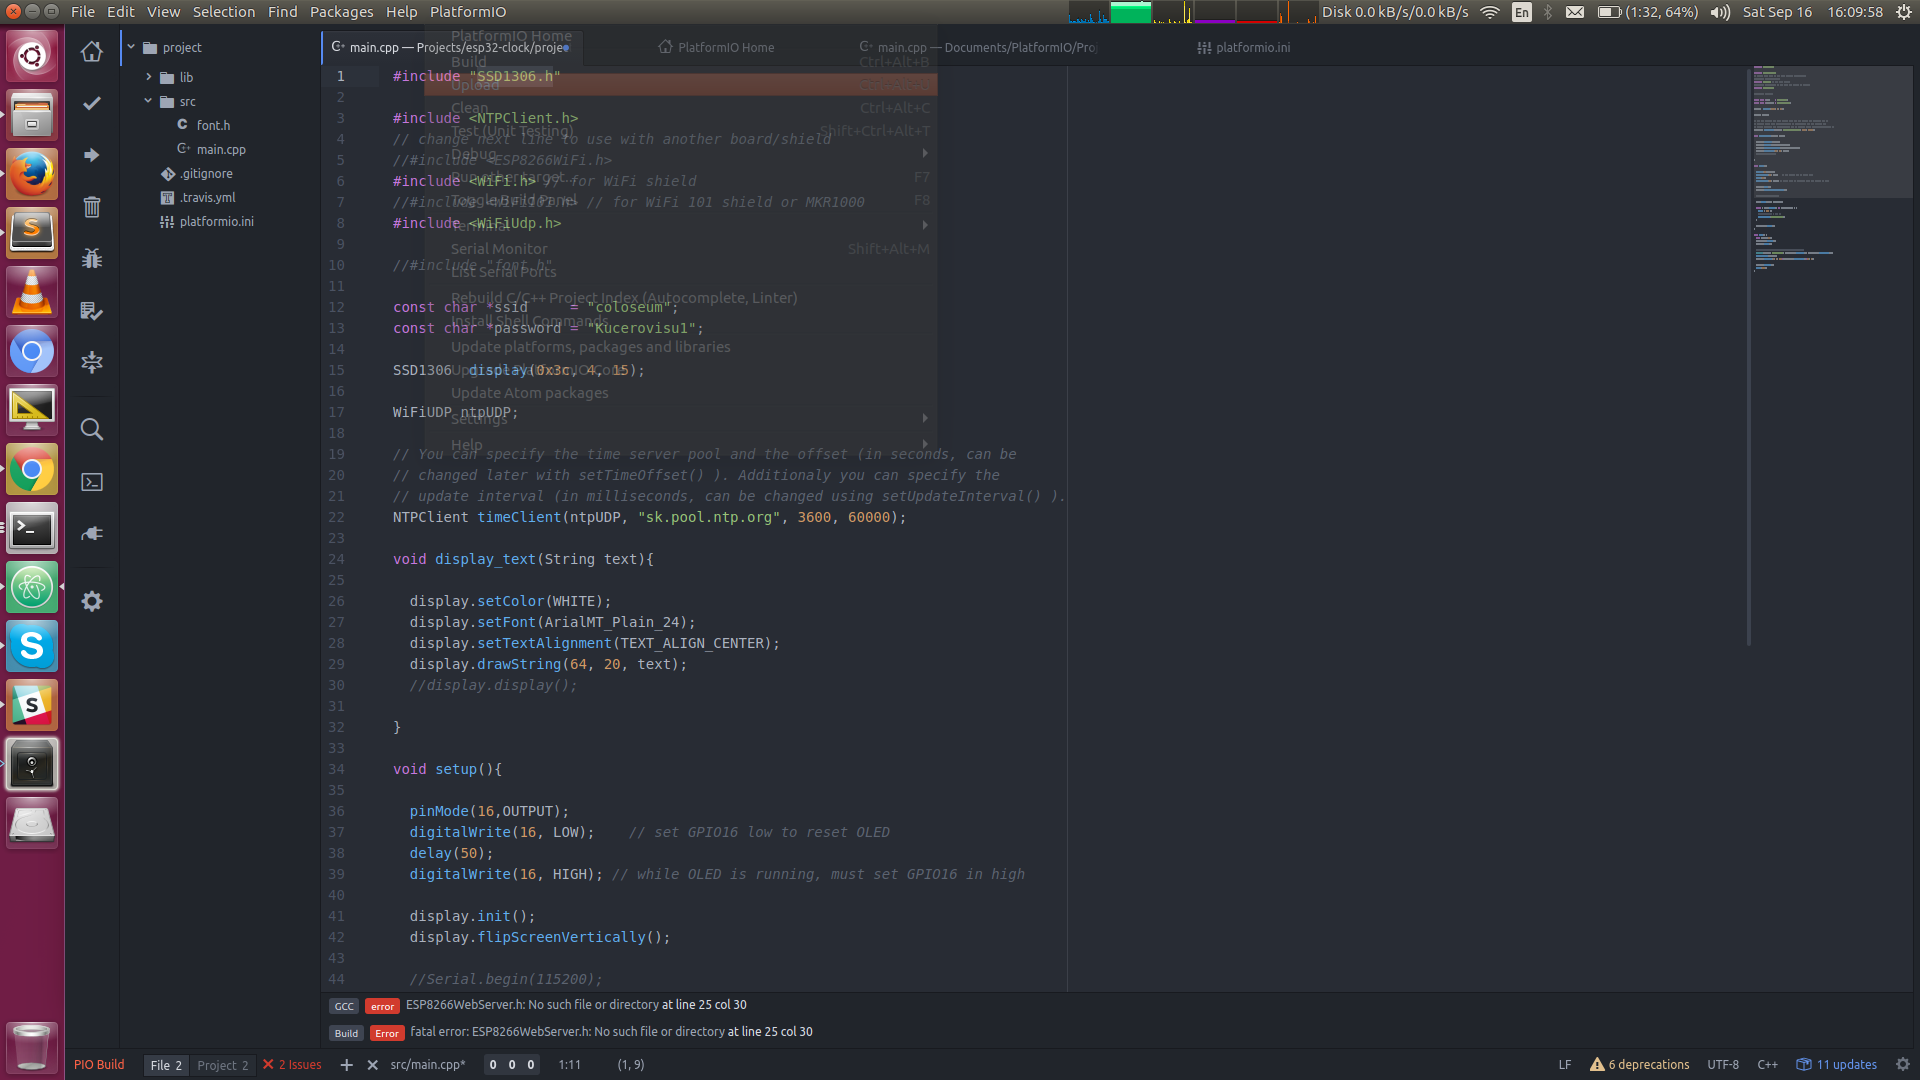
![]()
Unfortunately, nothing was shown, nor on serial port, nor on display. But one thing I was not sure about was display address defined by:
SSD1306 display(ADDRESS, SDA, SDC);
Because I bought very specific module with short description (because I liked it’s size), I needed to search a little bit but finally I’ve found the same one with more verbose description and WITH EXAMPLES! 🙂 The key to working display was to set right address and reset in on start:
SSD1306 display(0x3c, 4, 15);

 pinMode(16,OUTPUT);
 digitalWrite(16, LOW); // set GPIO16 low to reset OLED
 delay(50);
 digitalWrite(16, HIGH); // while OLED is running, must set GPIO16 in high
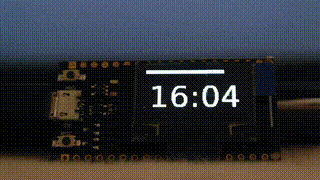
After this, I just did some fancy layout setup, generated huge font at http://oleddisplay.squix.ch, polished the code and you can see the result here:
 If you are interested in the source, you can find it here:
https://github.com/danielkucera/esp32-oled-clock
Now I’m thinking what will be my next project with this module and I already have some ideas.
Your code also works on “ESP32 Bluetooth WIFI Kit Blue OLED 0.96 inch Display Module CP2102 32M Flash 3.3V-7V Internet Development Board for Arduino” ( https://www.aliexpress.com/item/ESP32-Bluetooth-WIFI-Kit-0-96-inch-Blue-OLED-Display-Module-CP2102-32M-Flash-IOT-Internet/32825725963.html ). I just tried it!
Nice to know. Thank you. 🙂
For the Platformio part, you write “just choose some STM32 board”, I think you mean ESP32 😉
Oh, gosh… I still mix these two 😀 Thanks.
I tried this but for some reason the screen just says “CONN”. What does this mean and how might I fix it?
CONN means no wifi connection, you need to update wifi network name and password to suit your settings.
Thanks – the problem was with my particular WiFi network, it works with my mobile hotspot.
Couple of observations – my microcontroller gets extremely hot; my thoughts immediately to remedy this are to decrease the update frequency of the clock. Can you think of something else that might cause this.
Another general observation is the display is nice and bright but at night time it’s probably too bright – is there a way to decrease the brightness, and moreso is there a way to decrease the brightness according to the time of day?
Love the design, I also 3D printed a case for this board so that you can use it as a desktop clock or whatever. https://www.thingiverse.com/thing:2632841
The link is not working… I’ll check the temperature when I get home. You are right with the brightness, maybe this function can handle this: void setContrast(char contrast); ?
Yeah sorry about the link, thingiverse requires that you have an account for 24 hours before you can publish things – check back tomorrow!
I’ll give that function a try.
OK so I added “void setContrast(char contrast);” and “display.setContrast(0);” to the “void display_text” section. It does seem to have an effect on screen brightness somewhat, but less than I expected.
See details here: https://imgur.com/a/I10QQ
watch this: https://www.youtube.com/watch?v=hFpXfSnDNSY
I measured my module today with IR thermometer: display about 40 degC, ESP32 about 35degC, rest of the board less.
Interesting, I don’t have access to a thermometer but just from putting my finger on the heat sink, it seems a lot hotter than 35C. Wonder what that could be!
Thanks for the project,
I’m gonna try it and keep posted
Hi there,
I have installed PlatformIO but,
I got :
*** [.pioenvs/lolin32/src/main.cpp.o] Error 1
for this line :
#include
How can I install that library ?
Thanks
Compiling .pioenvs/lolin32/src/main.cpp.o
src/main.cpp:5:25: fatal error: ESP8266WiFi.h: No such file or directory
That line should be commented out:
https://github.com/danielkucera/esp32-oled-clock/blob/master/src/main.cpp#L5
Is there a chance to make a .ino file for Arduino IDE for this great Code
Hi robert, just take main.cpp, rename it to .ino and it should work (theoretically).
Hi
Nice work. It’s my first esp32 code…
Is it possible to define a time zone ?
Thanks a lot
By pressing a button you can adjust timezone. The setting is preserved after reboot.
Hi Danman
thanks for response for my last problem. It work so easy.
I dont know why, i have to comment this line:
display.setFont(Dialog_plain_40);
cause it make a error code: (unsigned char*}’ [-fpermissive])
so the display font is very small …
Can you help me to correct my problem please.
I fixed the code just now. Try to pull it and build again.
Awesome !
Thanks so much for this update, it solve my problem (no need to keep glass to see clock at night)