If you are interrested in security devices this post may be for you. Recently I’ve found a software which makes a GPG security device out of a STM32. It’s called Gnuk. You just need a compatible board, programmer, flash the firmware and you are ready to go. I was just hoping to find some cheap device to flash to play with it.
My next condition was it has to come with nice casing – I won’t carry some unprotected dev board in my pocket – ideally an USB key. Devices recommended in project itself were either not available anymore or expensive or just plain boards.
Hardware
After a short research on google and aliexpress I found ST-link programmer clones. They are very cheap, have nice aluminium case and should contain STM32F103. So I ordered one. The advantage is that if you don’t have STM programmer, you can order two and you will have everything needed.
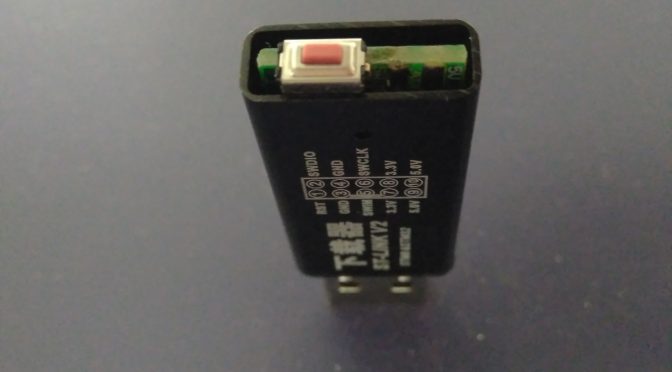
When it came it looked very nice so I tore it right down:

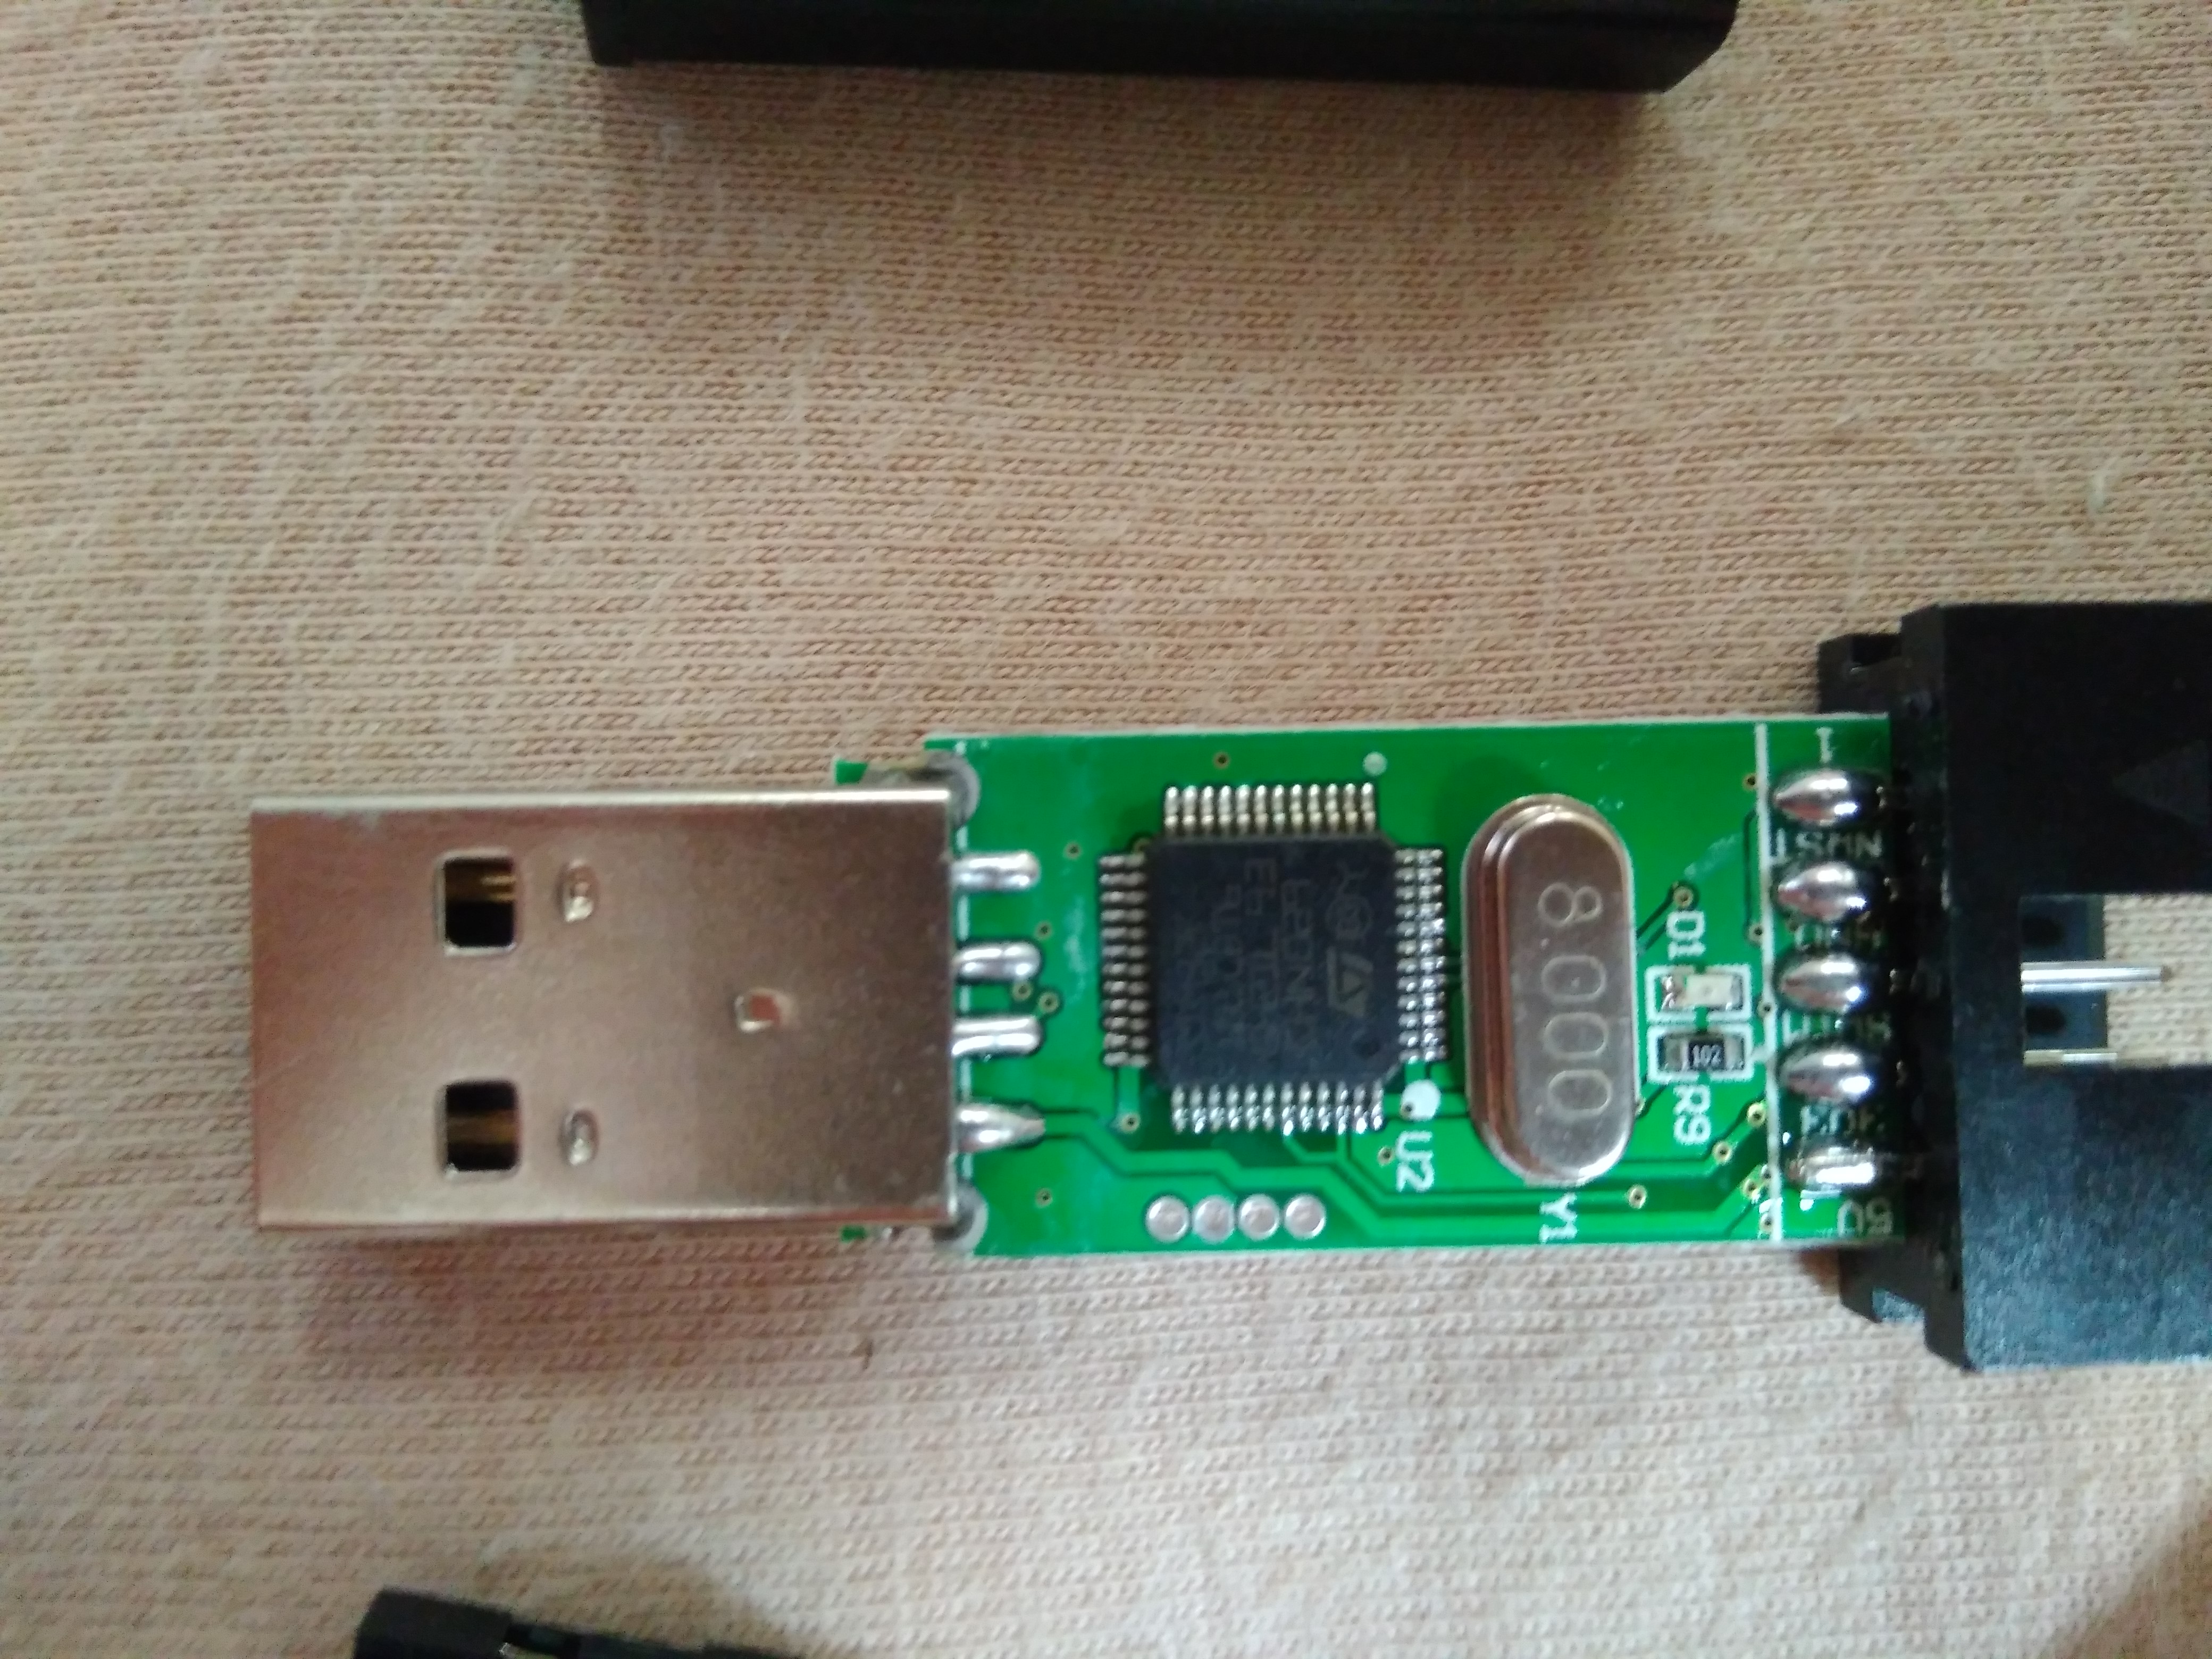
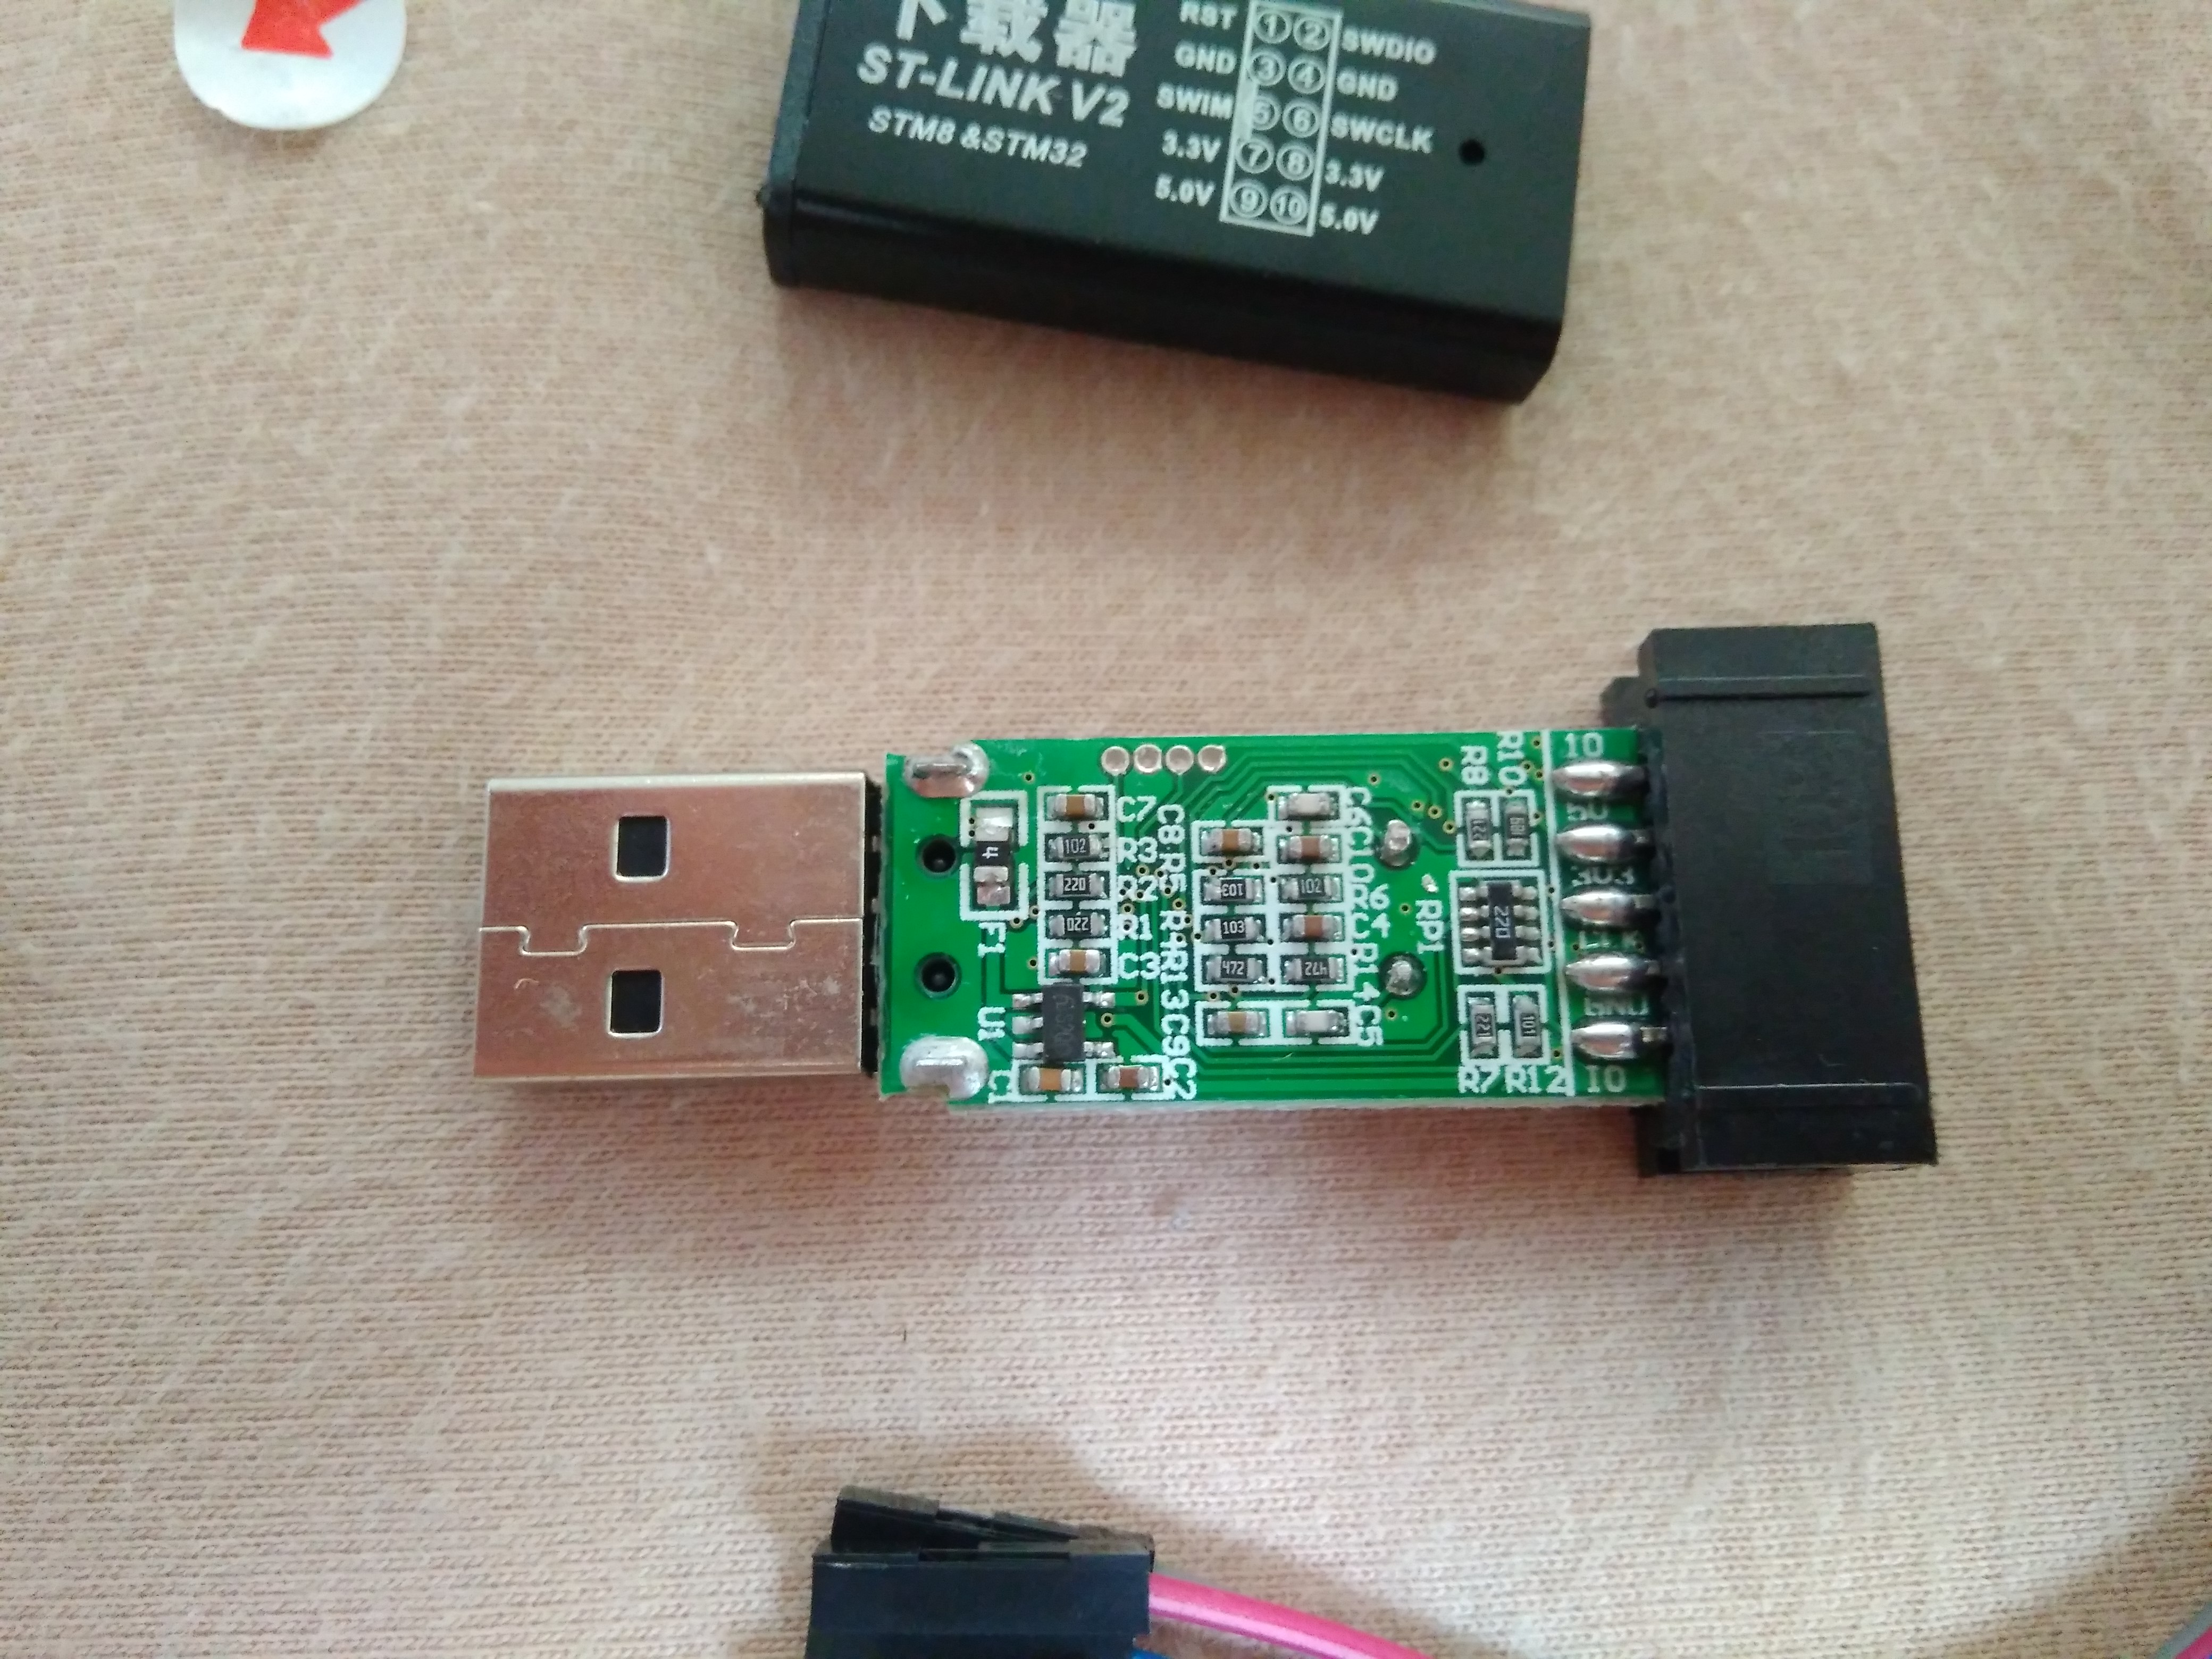
It was a little disappointment when I saw the chip – STM32F101CBT6 (128kB flash). I was afraid that I’ll need to port the software and moreover according to specs it shouldn’t have USB phy so I though they bit-banged the USB interface. Then I found one page where they discussed these devices and and they mentioned that in fact they have USB and they are compatible with F103.
So I gave it a try.
Firmware
First I built the firmware:
danman@silverhorse:~$ git clone git://anonscm.debian.org/gnuk/gnuk/gnuk.git
Cloning into 'gnuk'...
remote: Counting objects: 11644, done.
remote: Compressing objects: 100% (3812/3812), done.
remote: Total 11644 (delta 8560), reused 10561 (delta 7749)
Receiving objects: 100% (11644/11644), 12.04 MiB | 1.69 MiB/s, done.
Resolving deltas: 100% (8560/8560), done.
danman@silverhorse:~$ cd gnuk/
danman@silverhorse:~/gnuk$ git submodule update --init
Submodule 'chopstx' (git://anonscm.debian.org/gnuk/chopstx/chopstx.git) registered for path 'chopstx'
Cloning into '/home/danman/gnuk/chopstx'...
Submodule path 'chopstx': checked out '87767f1be5d8d4adac8d23a285250299eccee3fb'
danman@silverhorse:~/gnuk$ cd src/
danman@silverhorse:~/gnuk/src$ ./configure --vidpid=234b:0000 --target=ST_DONGLE
Header file is: board-st-dongle.h
Debug option disabled
Configured for bare system (no-DFU)
PIN pad option disabled
CERT.3 Data Object is NOT supported
Card insert/removal by HID device is NOT supported
Life cycle management is NOT supported
danman@silverhorse:~/gnuk/src$ make
mkdir -p build

arm-none-eabi-gcc -c -mcpu=cortex-m3 -O3 -Os -g -ffunction-sections -fdata-sections -fno-common -Wall -Wextra -Wstrict-prototypes -Wa,-alms=build/main.lst -mthumb -mno-thumb-interwork -DTHUMB -MD -MP -MF .dep/main.o.d -I. -I../polarssl/include -I../chopstx main.c -o build/main.o

arm-none-eabi-gcc -c -mcpu=cortex-m3 -O3 -Os -g -ffunction-sections -fdata-sections -fno-common -Wall -Wextra -Wstrict-prototypes -Wa,-alms=build/call-rsa.lst -mthumb -mno-thumb-interwork -DTHUMB -MD -MP -MF .dep/call-rsa.o.d -I. -I../polarssl/include -I../chopstx call-rsa.c -o build/call-rsa.o

arm-none-eabi-gcc -c -mcpu=cortex-m3 -O3 -Os -g -ffunction-sections -fdata-sections -fno-common -Wall -Wextra -Wstrict-prototypes -Wa,-alms=build/mcu-stm32f103.lst -mthumb -mno-thumb-interwork -DTHUMB -MD -MP -MF .dep/mcu-stm32f103.o.d -I. -I../polarssl/include -I../chopstx mcu-stm32f103.c -o build/mcu-stm32f103.o

arm-none-eabi-gcc -c -mcpu=cortex-m3 -O3 -Os -g -ffunction-sections -fdata-sections -fno-common -Wall -Wextra -Wstrict-prototypes -Wa,-alms=build/usb_desc.lst -mthumb -mno-thumb-interwork -DTHUMB -MD -MP -MF .dep/usb_desc.o.d -I. -I../polarssl/include -I../chopstx usb_desc.c -o build/usb_desc.o

arm-none-eabi-gcc -c -mcpu=cortex-m3 -O3 -Os -g -ffunction-sections -fdata-sections -fno-common -Wall -Wextra -Wstrict-prototypes -Wa,-alms=build/usb_ctrl.lst -mthumb -mno-thumb-interwork -DTHUMB -MD -MP -MF .dep/usb_ctrl.o.d -I. -I../polarssl/include -I../chopstx usb_ctrl.c -o build/usb_ctrl.o

arm-none-eabi-gcc -c -mcpu=cortex-m3 -O3 -Os -g -ffunction-sections -fdata-sections -fno-common -Wall -Wextra -Wstrict-prototypes -Wa,-alms=build/usb-ccid.lst -mthumb -mno-thumb-interwork -DTHUMB -MD -MP -MF .dep/usb-ccid.o.d -I. -I../polarssl/include -I../chopstx usb-ccid.c -o build/usb-ccid.o

arm-none-eabi-gcc -c -mcpu=cortex-m3 -O3 -Os -g -ffunction-sections -fdata-sections -fno-common -Wall -Wextra -Wstrict-prototypes -Wa,-alms=build/openpgp.lst -mthumb -mno-thumb-interwork -DTHUMB -MD -MP -MF .dep/openpgp.o.d -I. -I../polarssl/include -I../chopstx openpgp.c -o build/openpgp.o

arm-none-eabi-gcc -c -mcpu=cortex-m3 -O3 -Os -g -ffunction-sections -fdata-sections -fno-common -Wall -Wextra -Wstrict-prototypes -Wa,-alms=build/ac.lst -mthumb -mno-thumb-interwork -DTHUMB -MD -MP -MF .dep/ac.o.d -I. -I../polarssl/include -I../chopstx ac.c -o build/ac.o

arm-none-eabi-gcc -c -mcpu=cortex-m3 -O3 -Os -g -ffunction-sections -fdata-sections -fno-common -Wall -Wextra -Wstrict-prototypes -Wa,-alms=build/openpgp-do.lst -mthumb -mno-thumb-interwork -DTHUMB -MD -MP -MF .dep/openpgp-do.o.d -I. -I../polarssl/include -I../chopstx openpgp-do.c -o build/openpgp-do.o

arm-none-eabi-gcc -c -mcpu=cortex-m3 -O3 -Os -g -ffunction-sections -fdata-sections -fno-common -Wall -Wextra -Wstrict-prototypes -Wa,-alms=build/flash.lst -mthumb -mno-thumb-interwork -DTHUMB -MD -MP -MF .dep/flash.o.d -I. -I../polarssl/include -I../chopstx flash.c -o build/flash.o

arm-none-eabi-gcc -c -mcpu=cortex-m3 -O3 -Os -g -ffunction-sections -fdata-sections -fno-common -Wall -Wextra -Wstrict-prototypes -Wa,-alms=build/bn.lst -mthumb -mno-thumb-interwork -DTHUMB -MD -MP -MF .dep/bn.o.d -I. -I../polarssl/include -I../chopstx bn.c -o build/bn.o

arm-none-eabi-gcc -c -mcpu=cortex-m3 -O3 -Os -g -ffunction-sections -fdata-sections -fno-common -Wall -Wextra -Wstrict-prototypes -Wa,-alms=build/mod.lst -mthumb -mno-thumb-interwork -DTHUMB -MD -MP -MF .dep/mod.o.d -I. -I../polarssl/include -I../chopstx mod.c -o build/mod.o

arm-none-eabi-gcc -c -mcpu=cortex-m3 -O3 -Os -g -ffunction-sections -fdata-sections -fno-common -Wall -Wextra -Wstrict-prototypes -Wa,-alms=build/modp256r1.lst -mthumb -mno-thumb-interwork -DTHUMB -MD -MP -MF .dep/modp256r1.o.d -I. -I../polarssl/include -I../chopstx modp256r1.c -o build/modp256r1.o

arm-none-eabi-gcc -c -mcpu=cortex-m3 -O3 -Os -g -ffunction-sections -fdata-sections -fno-common -Wall -Wextra -Wstrict-prototypes -Wa,-alms=build/jpc_p256r1.lst -mthumb -mno-thumb-interwork -DTHUMB -MD -MP -MF .dep/jpc_p256r1.o.d -I. -I../polarssl/include -I../chopstx jpc_p256r1.c -o build/jpc_p256r1.o

arm-none-eabi-gcc -c -mcpu=cortex-m3 -O3 -Os -g -ffunction-sections -fdata-sections -fno-common -Wall -Wextra -Wstrict-prototypes -Wa,-alms=build/ec_p256r1.lst -mthumb -mno-thumb-interwork -DTHUMB -MD -MP -MF .dep/ec_p256r1.o.d -I. -I../polarssl/include -I../chopstx ec_p256r1.c -o build/ec_p256r1.o

arm-none-eabi-gcc -c -mcpu=cortex-m3 -O3 -Os -g -ffunction-sections -fdata-sections -fno-common -Wall -Wextra -Wstrict-prototypes -Wa,-alms=build/call-ec_p256r1.lst -mthumb -mno-thumb-interwork -DTHUMB -MD -MP -MF .dep/call-ec_p256r1.o.d -I. -I../polarssl/include -I../chopstx call-ec_p256r1.c -o build/call-ec_p256r1.o

arm-none-eabi-gcc -c -mcpu=cortex-m3 -O3 -Os -g -ffunction-sections -fdata-sections -fno-common -Wall -Wextra -Wstrict-prototypes -Wa,-alms=build/modp256k1.lst -mthumb -mno-thumb-interwork -DTHUMB -MD -MP -MF .dep/modp256k1.o.d -I. -I../polarssl/include -I../chopstx modp256k1.c -o build/modp256k1.o

arm-none-eabi-gcc -c -mcpu=cortex-m3 -O3 -Os -g -ffunction-sections -fdata-sections -fno-common -Wall -Wextra -Wstrict-prototypes -Wa,-alms=build/jpc_p256k1.lst -mthumb -mno-thumb-interwork -DTHUMB -MD -MP -MF .dep/jpc_p256k1.o.d -I. -I../polarssl/include -I../chopstx jpc_p256k1.c -o build/jpc_p256k1.o

arm-none-eabi-gcc -c -mcpu=cortex-m3 -O3 -Os -g -ffunction-sections -fdata-sections -fno-common -Wall -Wextra -Wstrict-prototypes -Wa,-alms=build/ec_p256k1.lst -mthumb -mno-thumb-interwork -DTHUMB -MD -MP -MF .dep/ec_p256k1.o.d -I. -I../polarssl/include -I../chopstx ec_p256k1.c -o build/ec_p256k1.o

arm-none-eabi-gcc -c -mcpu=cortex-m3 -O3 -Os -g -ffunction-sections -fdata-sections -fno-common -Wall -Wextra -Wstrict-prototypes -Wa,-alms=build/call-ec_p256k1.lst -mthumb -mno-thumb-interwork -DTHUMB -MD -MP -MF .dep/call-ec_p256k1.o.d -I. -I../polarssl/include -I../chopstx call-ec_p256k1.c -o build/call-ec_p256k1.o

arm-none-eabi-gcc -c -mcpu=cortex-m3 -O3 -Os -g -ffunction-sections -fdata-sections -fno-common -Wall -Wextra -Wstrict-prototypes -Wa,-alms=build/mod25638.lst -mthumb -mno-thumb-interwork -DTHUMB -MD -MP -MF .dep/mod25638.o.d -I. -I../polarssl/include -I../chopstx mod25638.c -o build/mod25638.o

arm-none-eabi-gcc -c -mcpu=cortex-m3 -O3 -Os -g -ffunction-sections -fdata-sections -fno-common -Wall -Wextra -Wstrict-prototypes -Wa,-alms=build/ecc-edwards.lst -mthumb -mno-thumb-interwork -DTHUMB -MD -MP -MF .dep/ecc-edwards.o.d -I. -I../polarssl/include -I../chopstx ecc-edwards.c -o build/ecc-edwards.o

arm-none-eabi-gcc -c -mcpu=cortex-m3 -O3 -Os -g -ffunction-sections -fdata-sections -fno-common -Wall -Wextra -Wstrict-prototypes -Wa,-alms=build/ecc-mont.lst -mthumb -mno-thumb-interwork -DTHUMB -MD -MP -MF .dep/ecc-mont.o.d -I. -I../polarssl/include -I../chopstx ecc-mont.c -o build/ecc-mont.o

arm-none-eabi-gcc -c -mcpu=cortex-m3 -O3 -Os -g -ffunction-sections -fdata-sections -fno-common -Wall -Wextra -Wstrict-prototypes -Wa,-alms=build/sha512.lst -mthumb -mno-thumb-interwork -DTHUMB -MD -MP -MF .dep/sha512.o.d -I. -I../polarssl/include -I../chopstx sha512.c -o build/sha512.o

arm-none-eabi-gcc -c -mcpu=cortex-m3 -O3 -Os -g -ffunction-sections -fdata-sections -fno-common -Wall -Wextra -Wstrict-prototypes -Wa,-alms=build/random.lst -mthumb -mno-thumb-interwork -DTHUMB -MD -MP -MF .dep/random.o.d -I. -I../polarssl/include -I../chopstx random.c -o build/random.o

arm-none-eabi-gcc -c -mcpu=cortex-m3 -O3 -Os -g -ffunction-sections -fdata-sections -fno-common -Wall -Wextra -Wstrict-prototypes -Wa,-alms=build/neug.lst -mthumb -mno-thumb-interwork -DTHUMB -MD -MP -MF .dep/neug.o.d -I. -I../polarssl/include -I../chopstx neug.c -o build/neug.o

arm-none-eabi-gcc -c -mcpu=cortex-m3 -O3 -Os -g -ffunction-sections -fdata-sections -fno-common -Wall -Wextra -Wstrict-prototypes -Wa,-alms=build/sha256.lst -mthumb -mno-thumb-interwork -DTHUMB -MD -MP -MF .dep/sha256.o.d -I. -I../polarssl/include -I../chopstx sha256.c -o build/sha256.o

arm-none-eabi-gcc -c -mcpu=cortex-m3 -O3 -g -Wall -Wextra -Wstrict-prototypes -Wa,-alms=build/bignum.lst -mthumb -mno-thumb-interwork -DTHUMB -MD -MP -MF .dep/bignum.o.d -I. -I../polarssl/include -I../chopstx ../polarssl/library/bignum.c -o build/bignum.o

arm-none-eabi-gcc -c -mcpu=cortex-m3 -O3 -Os -g -ffunction-sections -fdata-sections -fno-common -Wall -Wextra -Wstrict-prototypes -Wa,-alms=build/rsa.lst -mthumb -mno-thumb-interwork -DTHUMB -MD -MP -MF .dep/rsa.o.d -I. -I../polarssl/include -I../chopstx ../polarssl/library/rsa.c -o build/rsa.o

arm-none-eabi-gcc -c -mcpu=cortex-m3 -O3 -Os -g -ffunction-sections -fdata-sections -fno-common -Wall -Wextra -Wstrict-prototypes -Wa,-alms=build/aes.lst -mthumb -mno-thumb-interwork -DTHUMB -MD -MP -MF .dep/aes.o.d -I. -I../polarssl/include -I../chopstx ../polarssl/library/aes.c -o build/aes.o

arm-none-eabi-gcc -c -mcpu=cortex-m3 -O3 -Os -g -ffunction-sections -fdata-sections -fno-common -Wall -Wextra -Wstrict-prototypes -Wa,-alms=build/entry.lst -mthumb -mno-thumb-interwork -DTHUMB -MD -MP -MF .dep/entry.o.d -I. -I../polarssl/include -I../chopstx ../chopstx/entry.c -o build/entry.o

arm-none-eabi-gcc -c -mcpu=cortex-m3 -O3 -Os -g -ffunction-sections -fdata-sections -fno-common -Wall -Wextra -Wstrict-prototypes -Wa,-alms=build/chopstx.lst -mthumb -mno-thumb-interwork -DTHUMB -MD -MP -MF .dep/chopstx.o.d -I. -I../polarssl/include -I../chopstx ../chopstx/chopstx.c -o build/chopstx.o

arm-none-eabi-gcc -c -mcpu=cortex-m3 -O3 -Os -g -ffunction-sections -fdata-sections -fno-common -Wall -Wextra -Wstrict-prototypes -Wa,-alms=build/eventflag.lst -mthumb -mno-thumb-interwork -DTHUMB -MD -MP -MF .dep/eventflag.o.d -I. -I../polarssl/include -I../chopstx ../chopstx/eventflag.c -o build/eventflag.o

arm-none-eabi-gcc -c -mcpu=cortex-m3 -O3 -Os -g -ffunction-sections -fdata-sections -fno-common -Wall -Wextra -Wstrict-prototypes -Wa,-alms=build/sys-stm32f103.lst -mthumb -mno-thumb-interwork -DTHUMB -MD -MP -MF .dep/sys-stm32f103.o.d -I. -I../polarssl/include -I../chopstx ../chopstx/mcu/sys-stm32f103.c -o build/sys-stm32f103.o

arm-none-eabi-gcc -c -mcpu=cortex-m3 -O3 -Os -g -ffunction-sections -fdata-sections -fno-common -Wall -Wextra -Wstrict-prototypes -Wa,-alms=build/usb-stm32f103.lst -mthumb -mno-thumb-interwork -DTHUMB -MD -MP -MF .dep/usb-stm32f103.o.d -I. -I../polarssl/include -I../chopstx ../chopstx/mcu/usb-stm32f103.c -o build/usb-stm32f103.o

arm-none-eabi-gcc -c -mcpu=cortex-m3 -O3 -Os -g -ffunction-sections -fdata-sections -fno-common -Wall -Wextra -Wstrict-prototypes -Wa,-alms=build/adc-stm32f103.lst -mthumb -mno-thumb-interwork -DTHUMB -MD -MP -MF .dep/adc-stm32f103.o.d -I. -I../polarssl/include -I../chopstx ../chopstx/contrib/adc-stm32f103.c -o build/adc-stm32f103.o

arm-none-eabi-gcc build/main.o build/call-rsa.o build/mcu-stm32f103.o build/usb_desc.o build/usb_ctrl.o build/usb-ccid.o build/openpgp.o build/ac.o build/openpgp-do.o build/flash.o build/bn.o build/mod.o build/modp256r1.o build/jpc_p256r1.o build/ec_p256r1.o build/call-ec_p256r1.o build/modp256k1.o build/jpc_p256k1.o build/ec_p256k1.o build/call-ec_p256k1.o build/mod25638.o build/ecc-edwards.o build/ecc-mont.o build/sha512.o build/random.o build/neug.o build/sha256.o build/bignum.o build/rsa.o build/aes.o build/entry.o build/chopstx.o build/eventflag.o build/sys-stm32f103.o build/usb-stm32f103.o build/adc-stm32f103.o -mcpu=cortex-m3 -nostartfiles -Tgnuk.ld -Wl,-Map=build/gnuk.map,--cref,--no-warn-mismatch,--gc-sections -mthumb -mno-thumb-interwork -o build/gnuk.elf
arm-none-eabi-objcopy -O binary build/gnuk.elf build/gnuk.bin
Programming
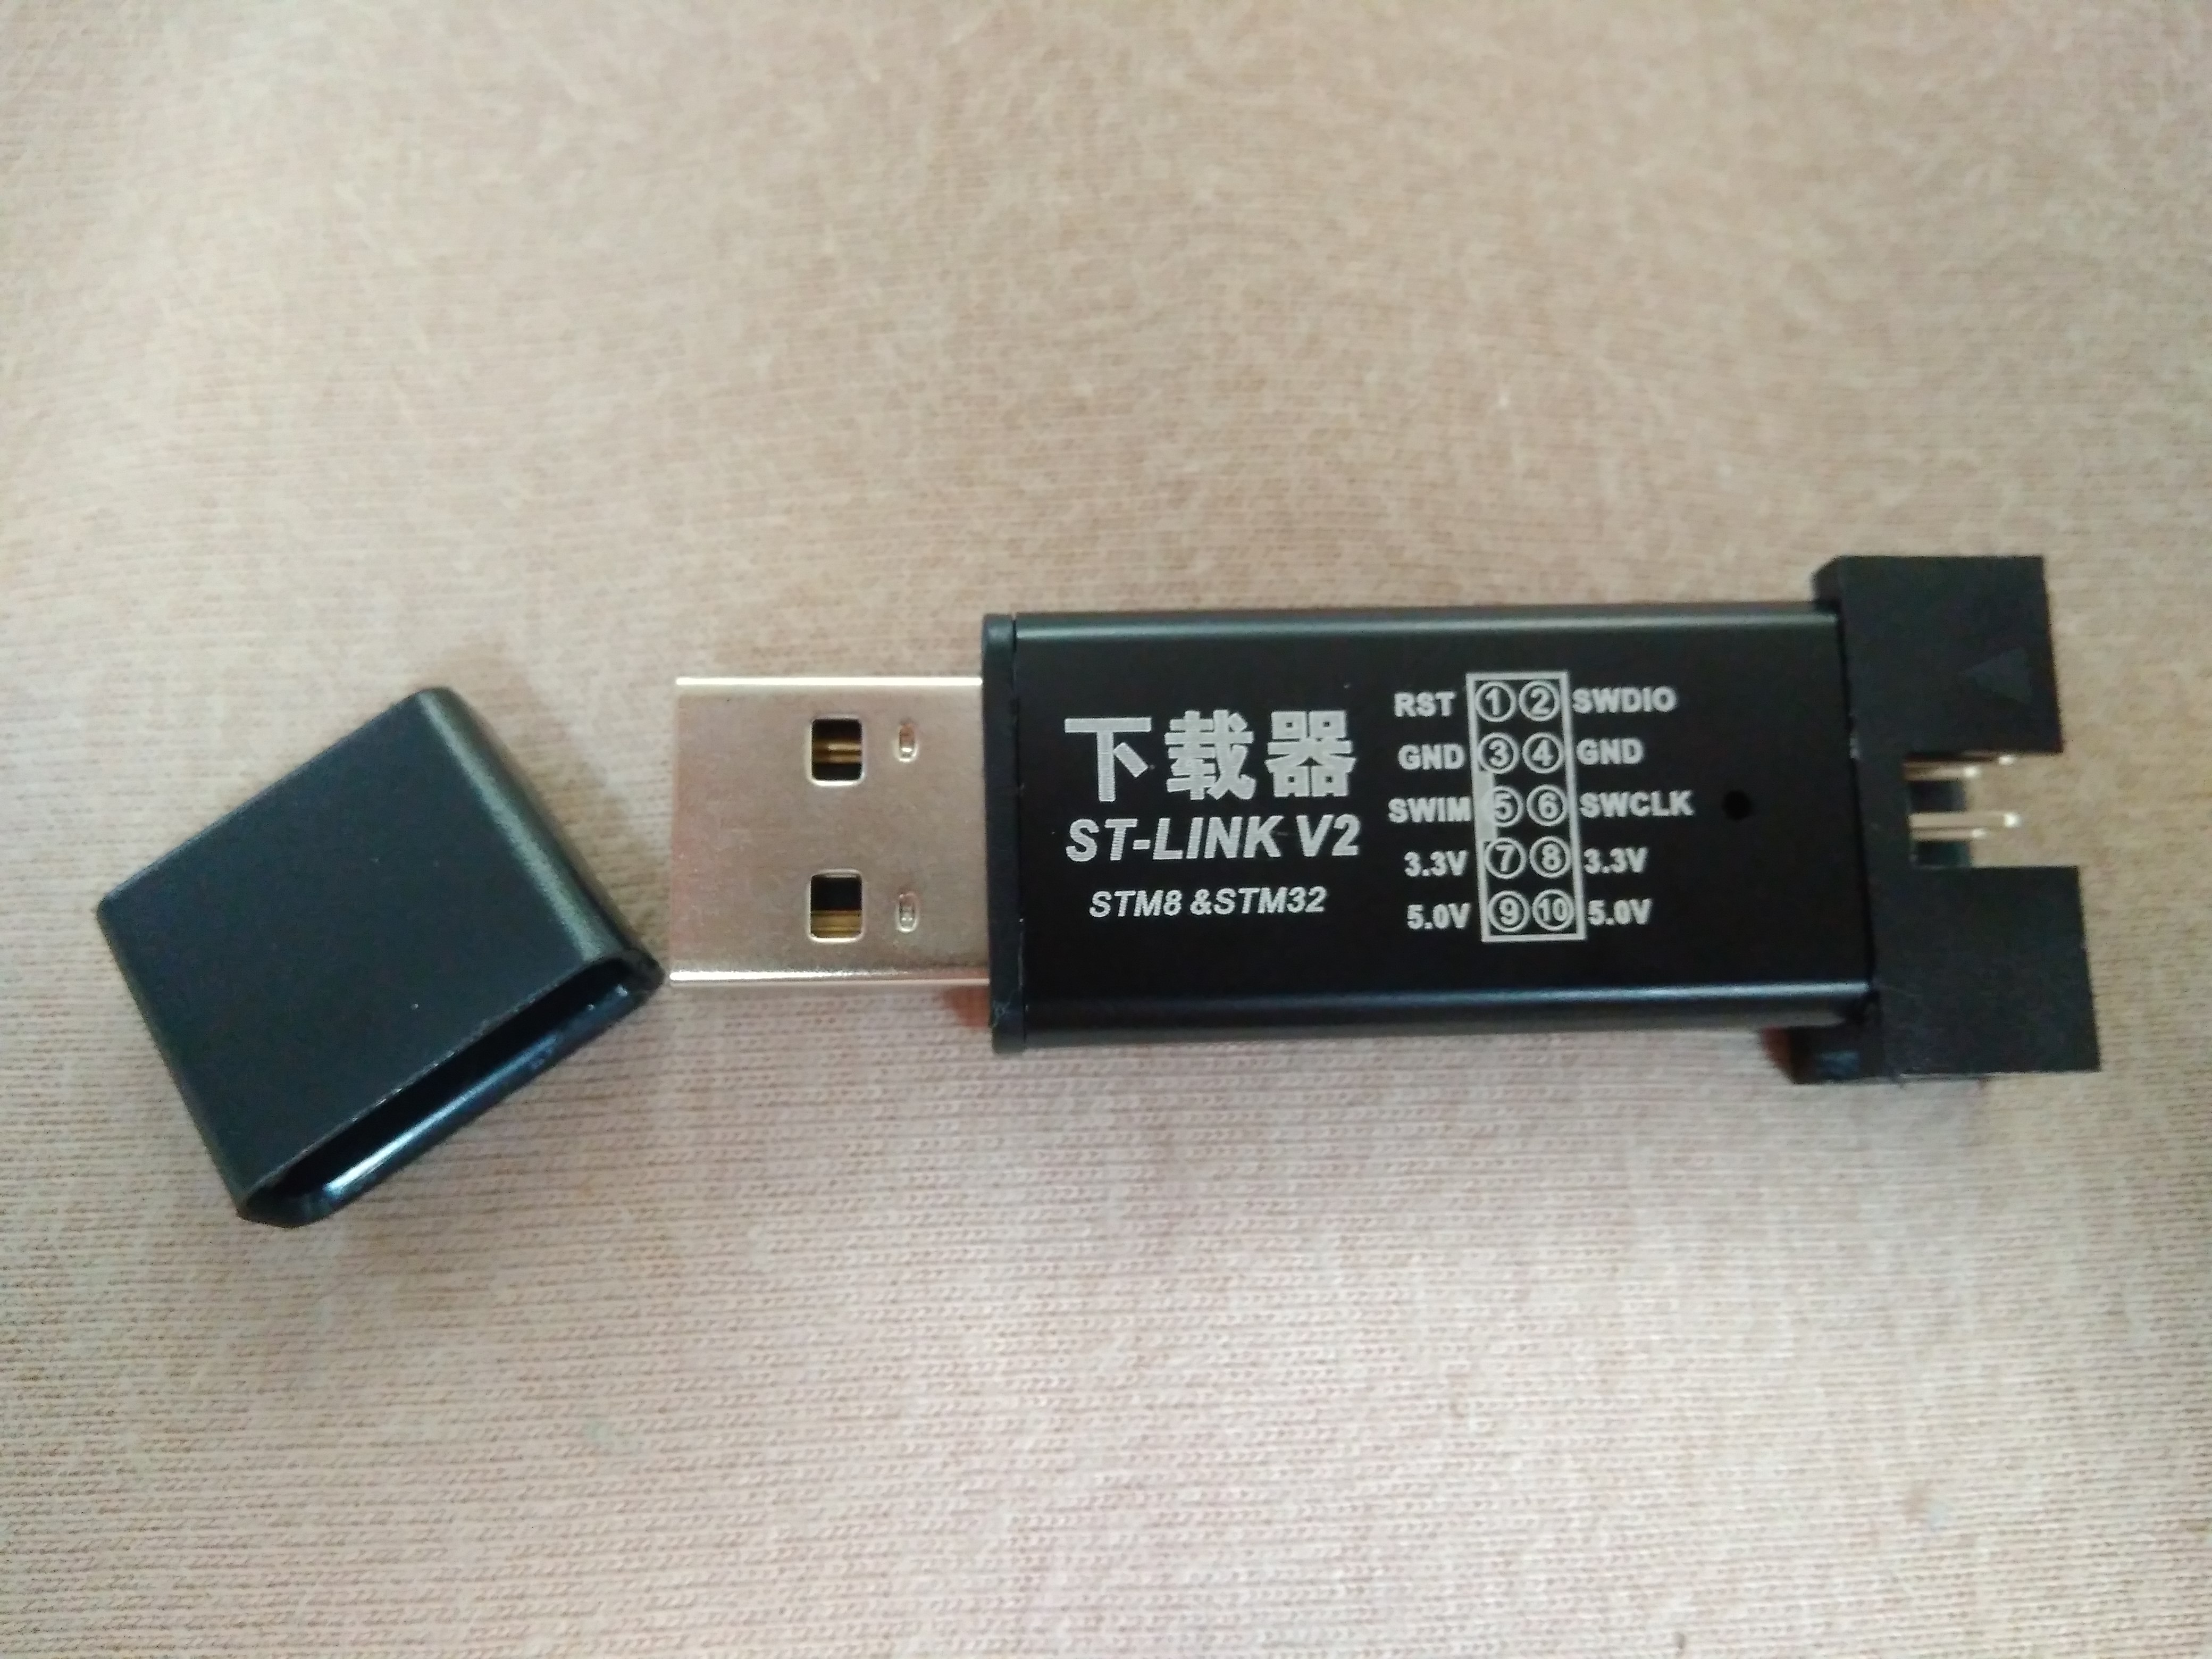
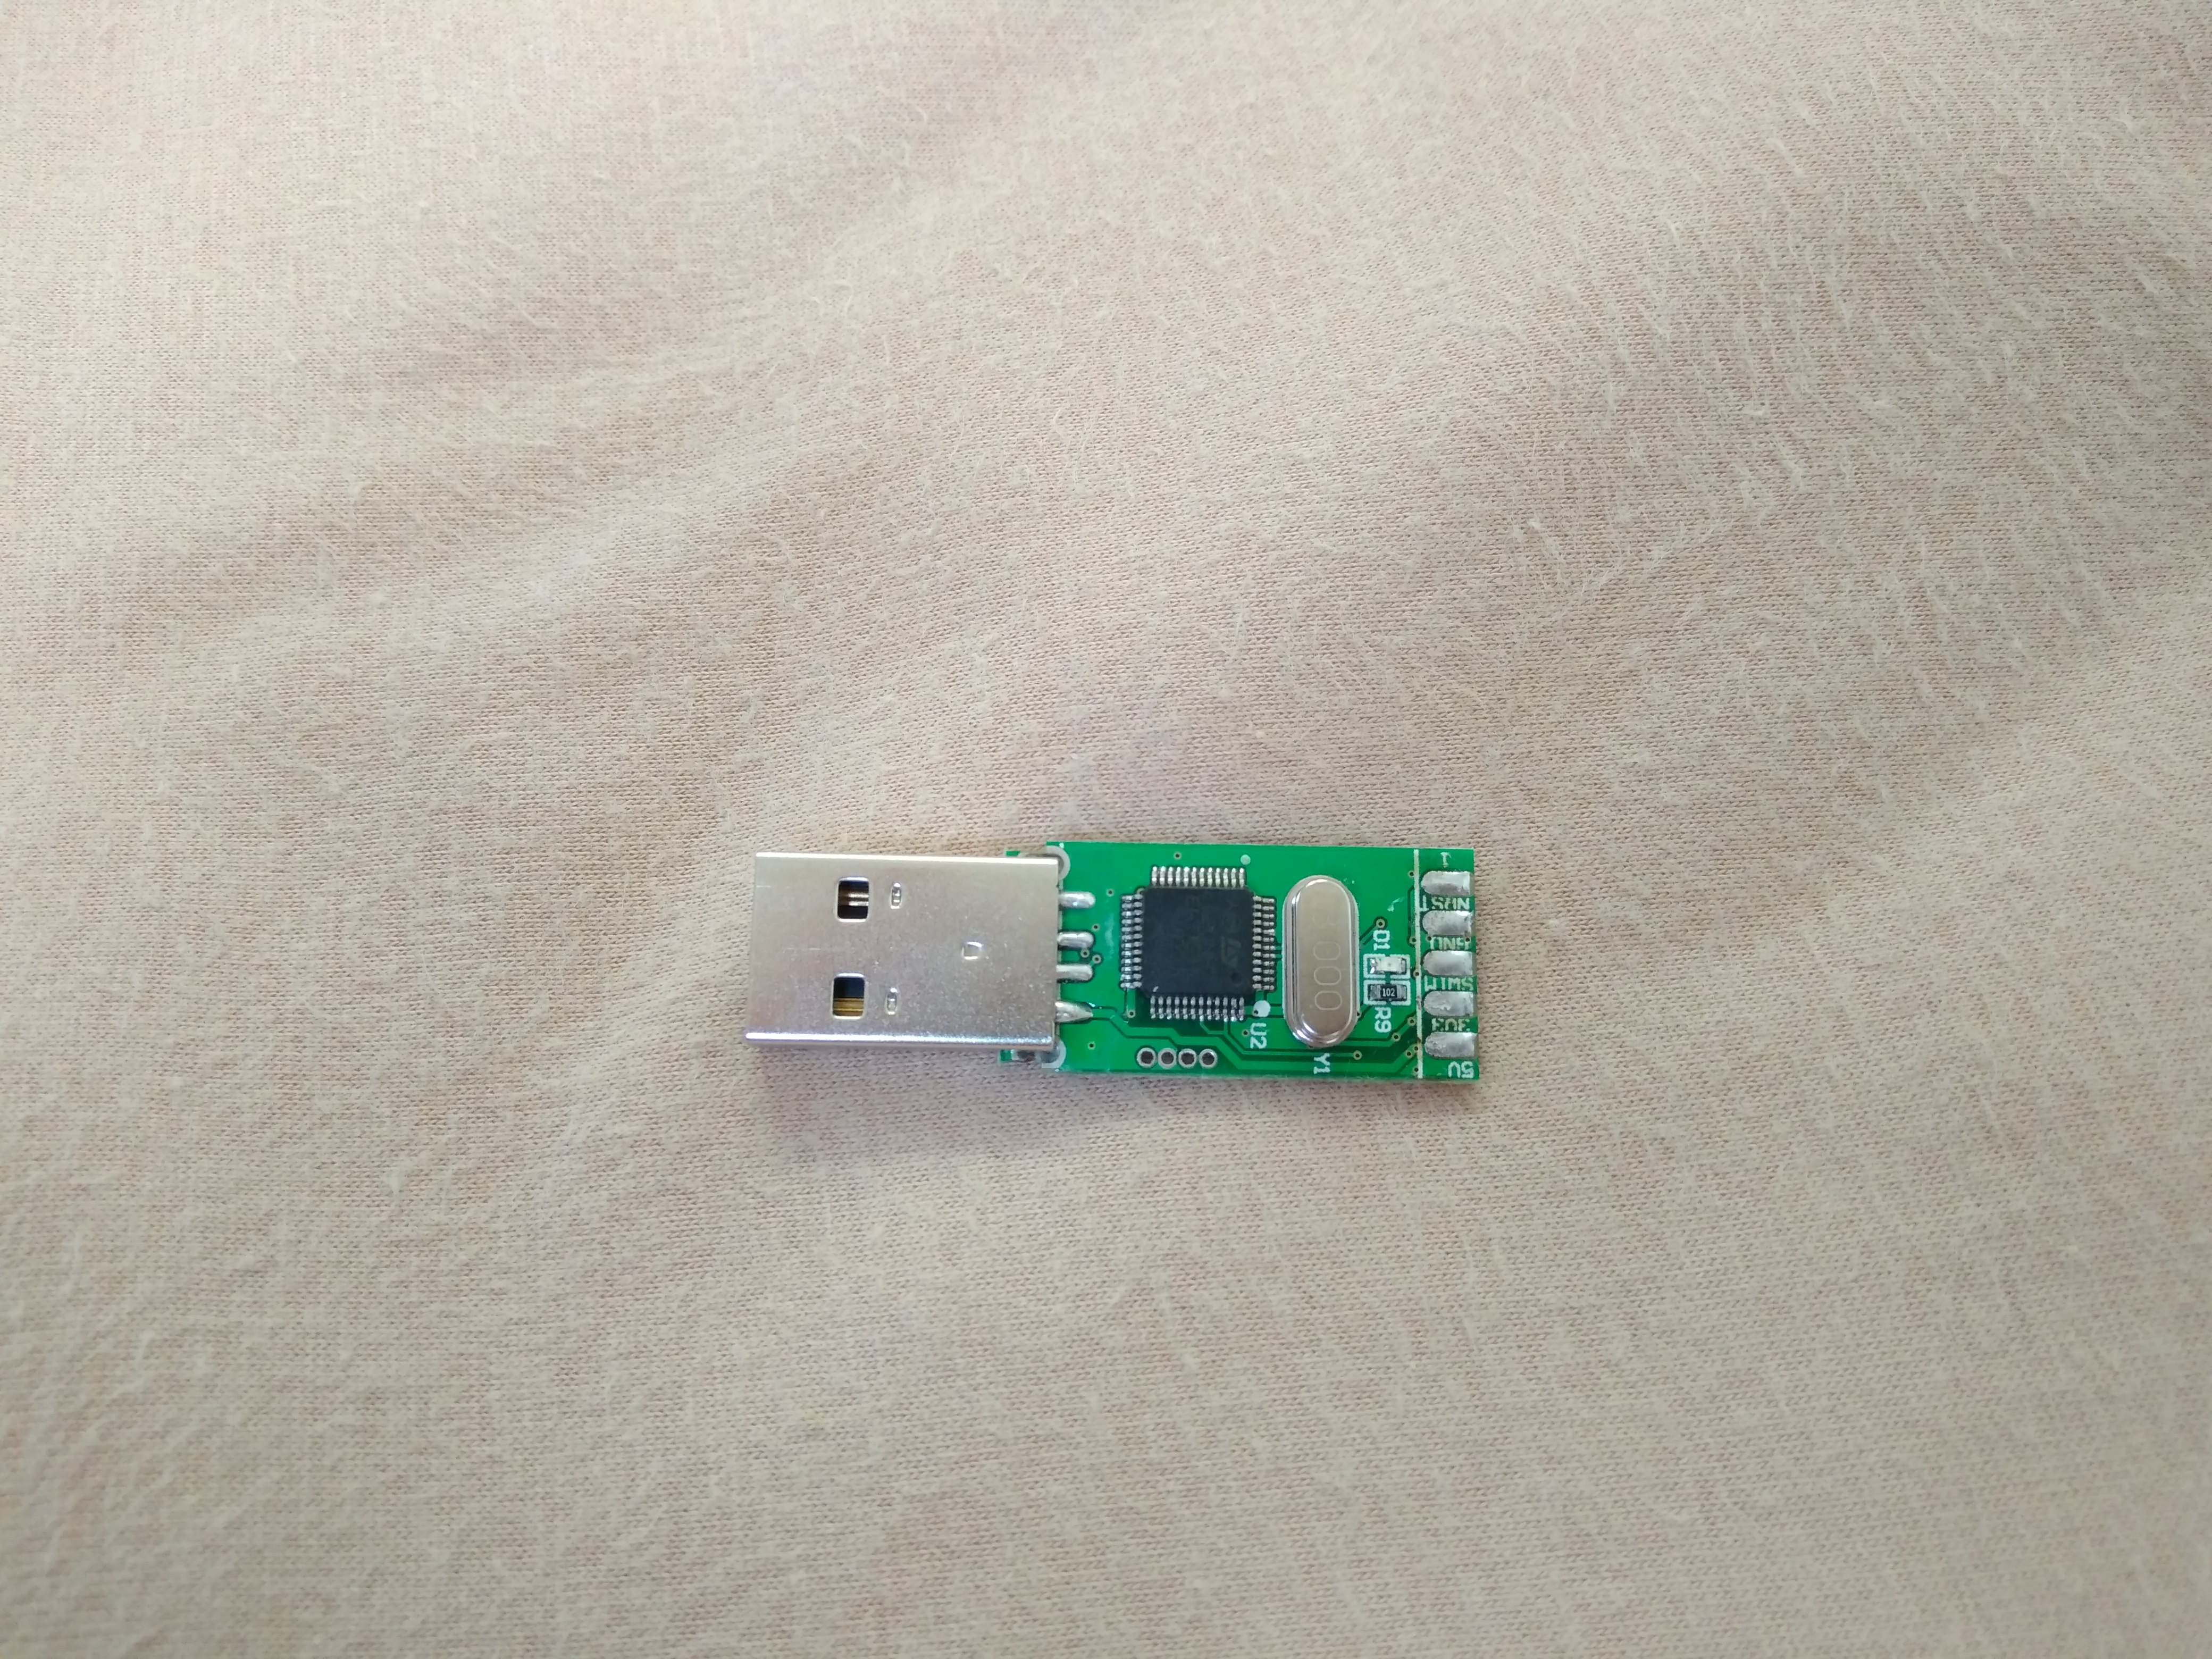
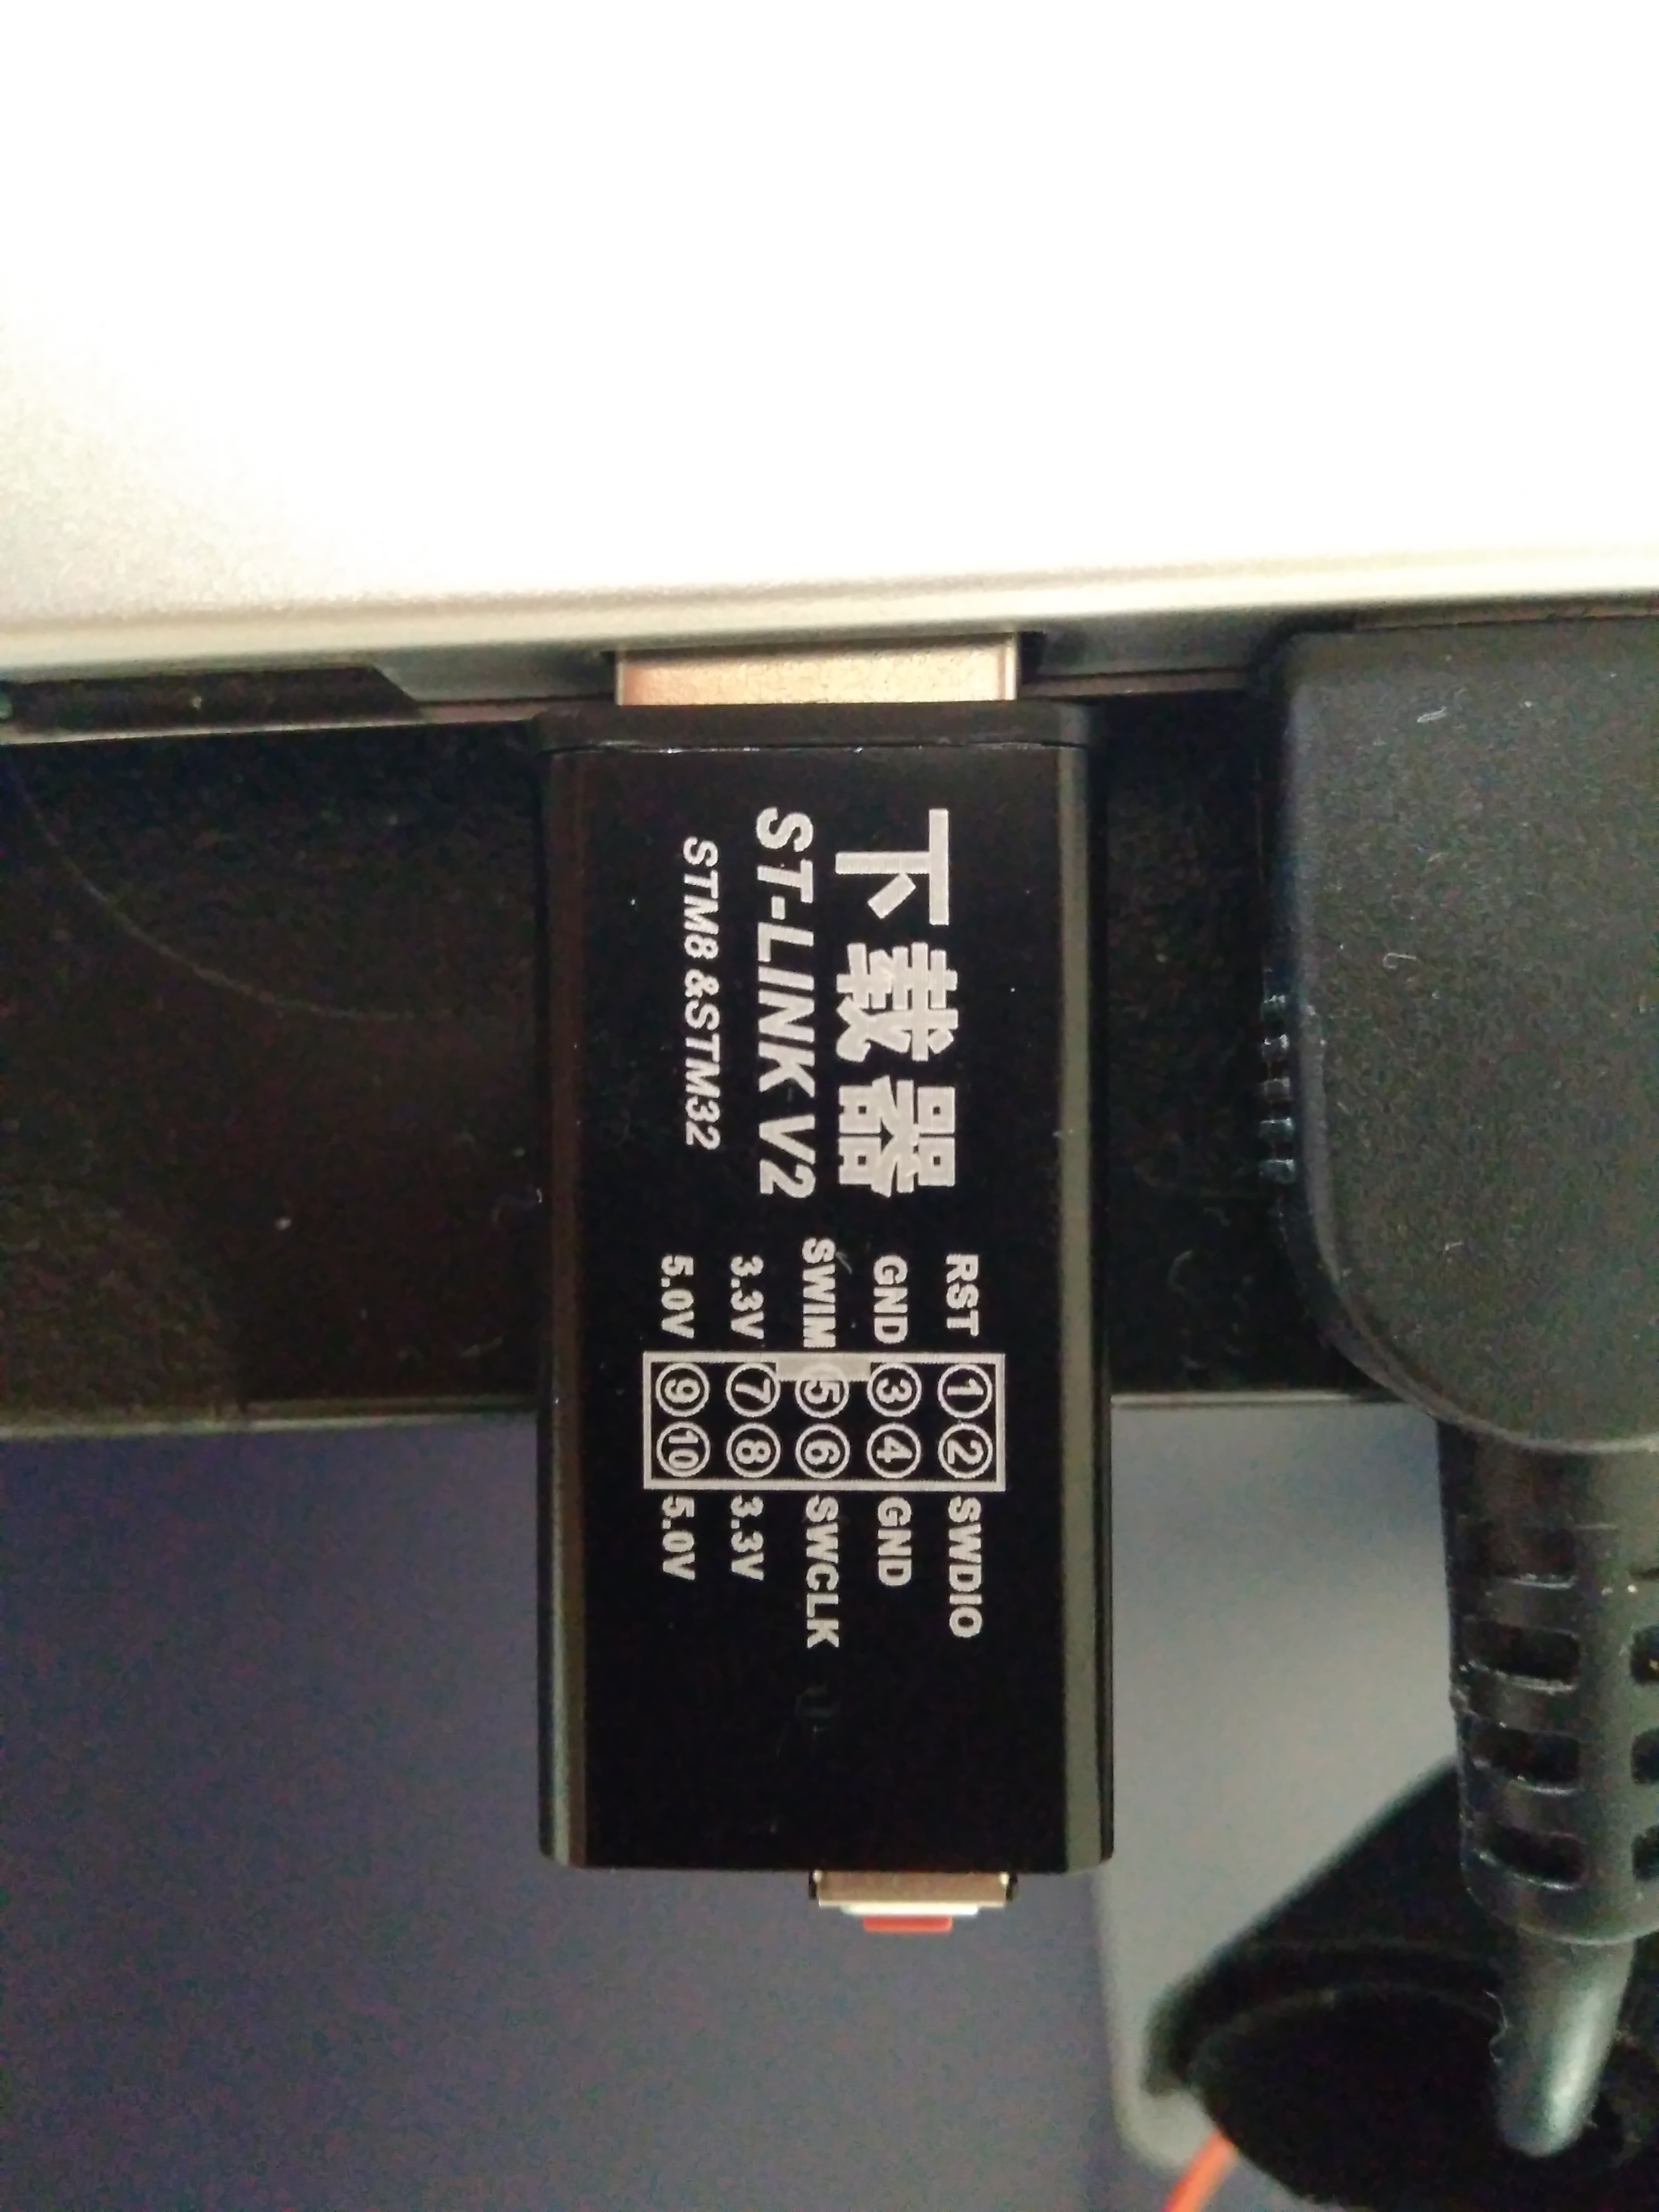
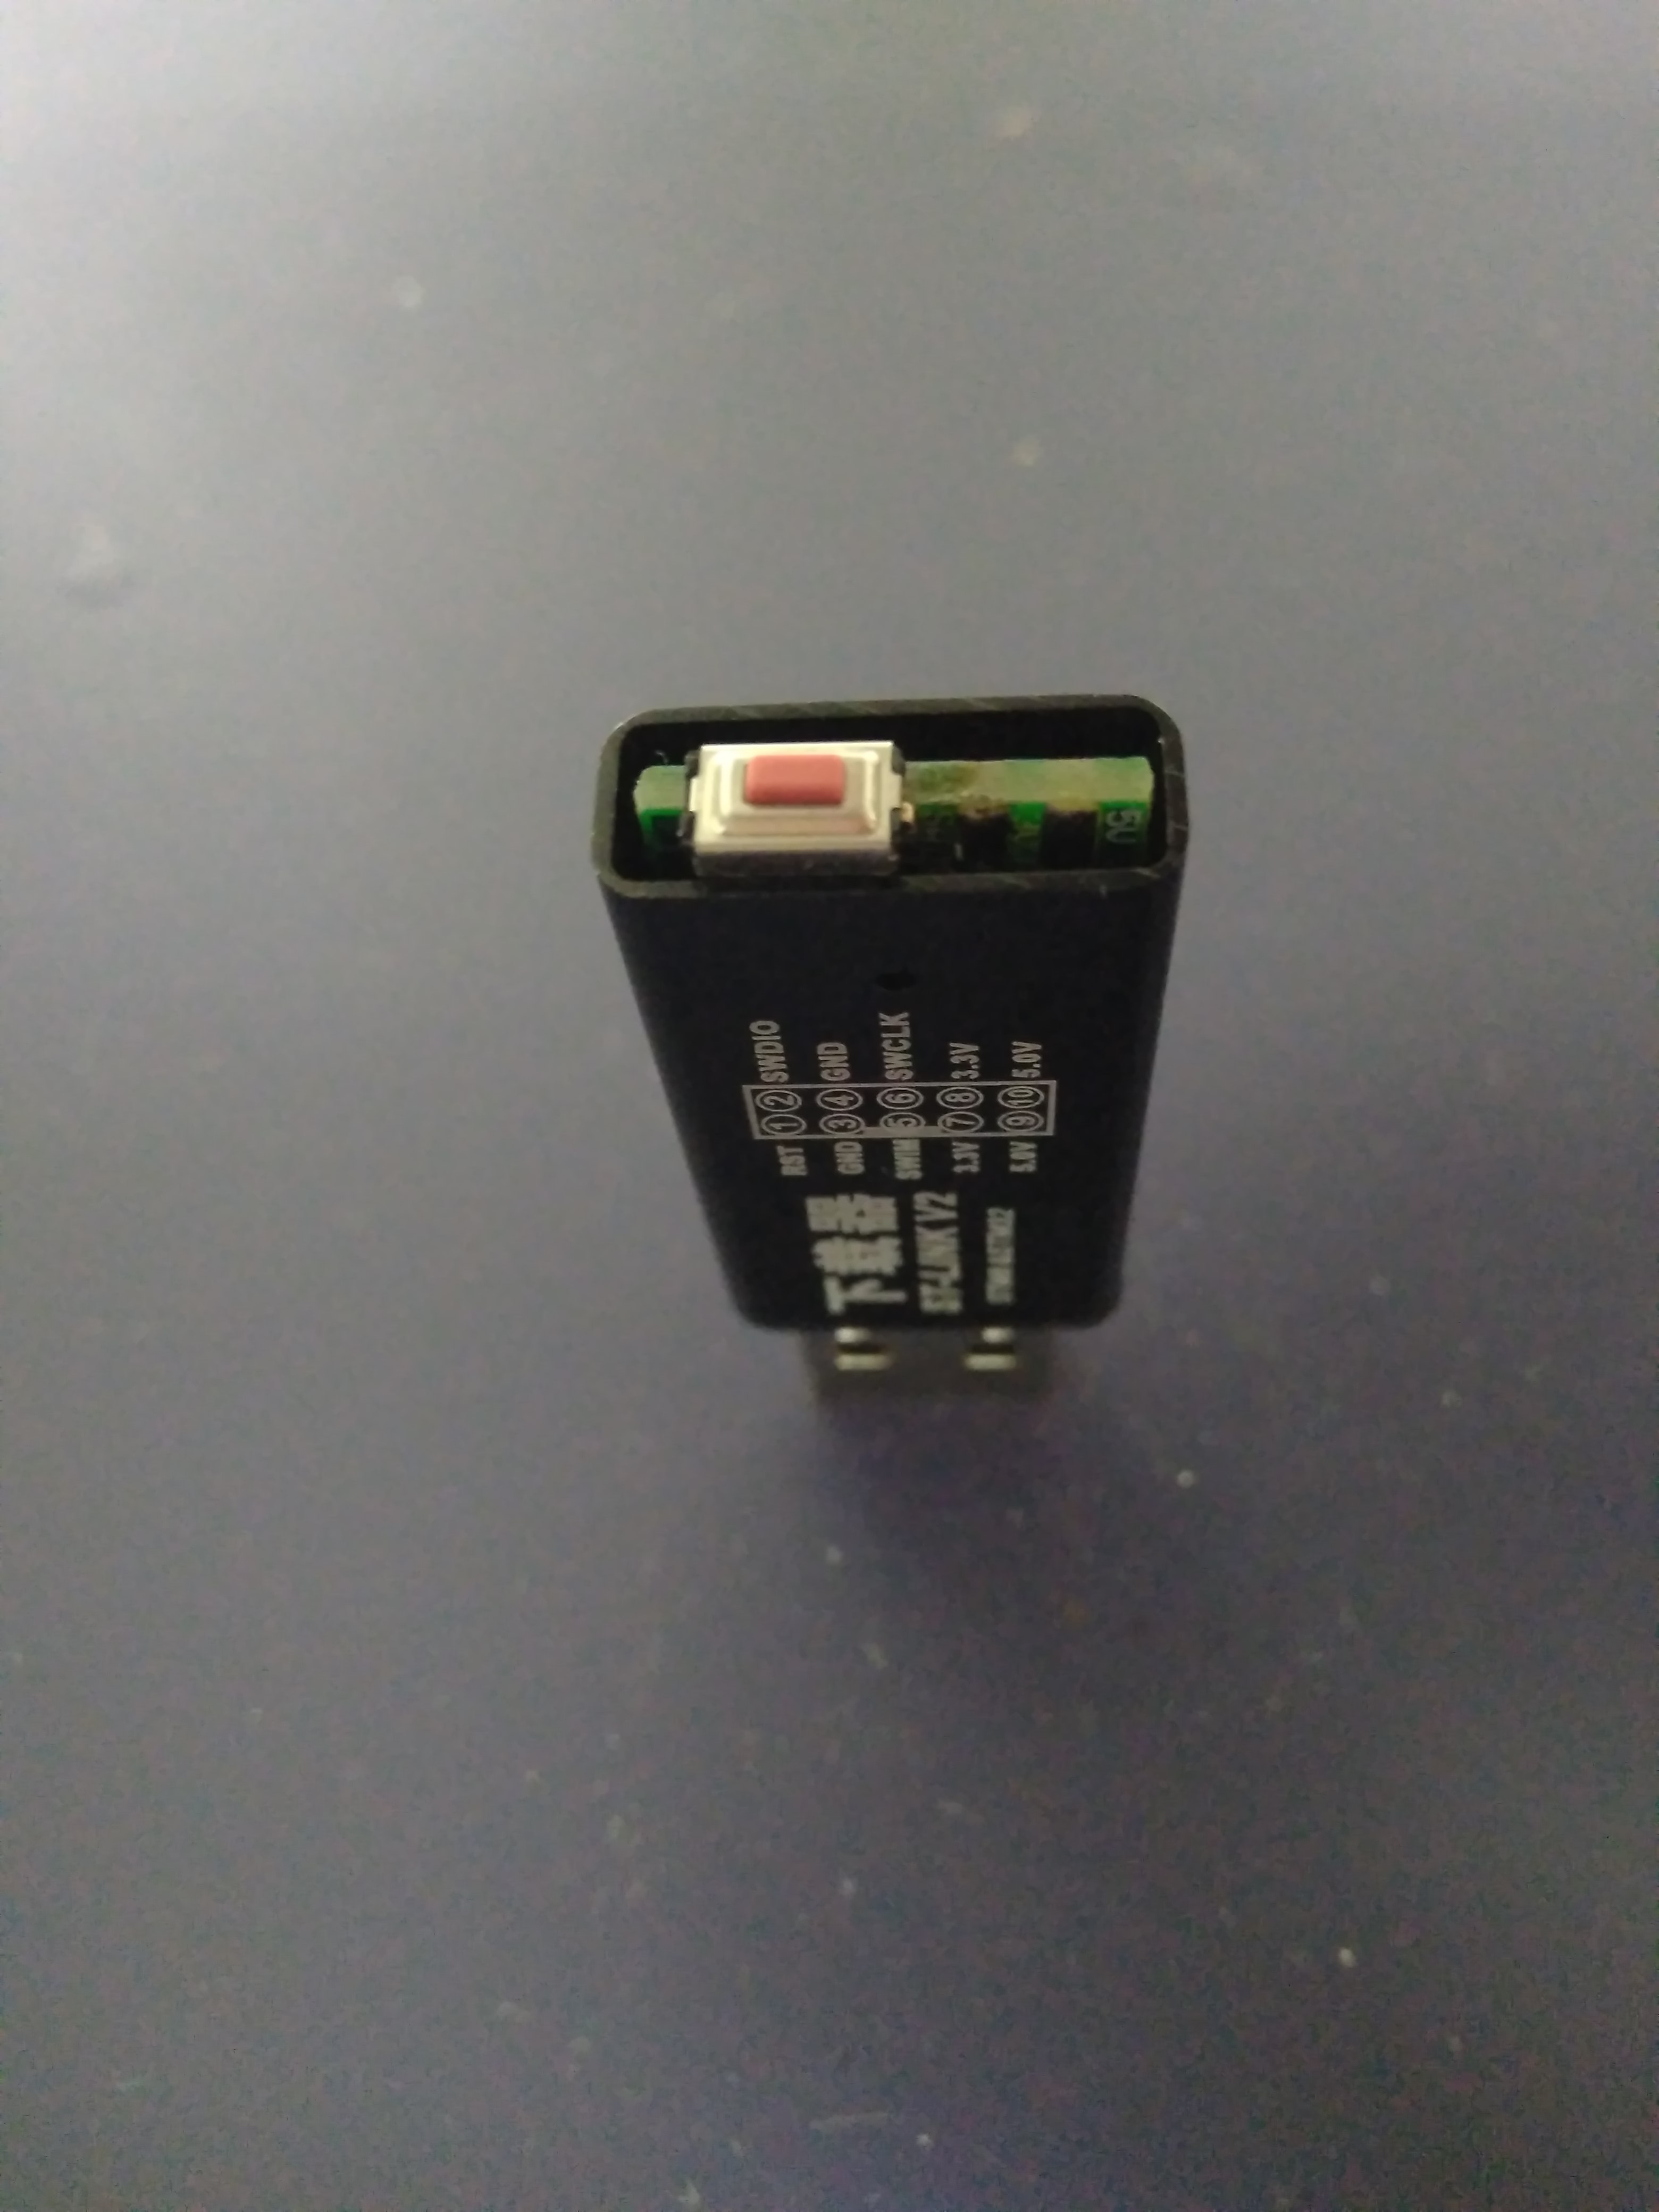
Then I connected my J-link programmer. VCC and GND was easy to probe and the rest two pins (SWD, SWCLK) were identified by trying. The order of pins is following (first is closest to USB):
- SWDIO
- GND
- SWCLK
- 3V3

For connecting using openocd I used a config which I had used before for F103.
#daemon configuration
telnet_port 4444
gdb_port 3333

#interface
interface jlink
transport select swd

# The chip has 64KB sram
set WORKAREASIZE 0x10000

source [find target/stm32f1x.cfg]
#adapter_khz 100
gdb_breakpoint_override hard
After starting openocd, I unlocked flash, and burned new firmware:
$ openocd stm32f103.cfg

#in new shell
$ telnet localhost 4444> stm32f1x unlock 0
Device Security Bit Set
stm32x unlocked.
INFO: a reset or power cycle is required for the new settings to take effect.
> reset halt
target state: halted
target halted due to debug-request, current mode: Thread
xPSR: 0x01000000 pc: 0xfffffffe msp: 0xfffffffc
> stm32f1x unlock 0
Device Security Bit Set
target halted due to breakpoint, current mode: Thread
xPSR: 0x61000000 pc: 0x2000003a msp: 0x20000800
stm32x unlocked.
INFO: a reset or power cycle is required for the new settings to take effect.
> reset halt
target halted due to debug-request, current mode: Thread
xPSR: 0x01000000 pc: 0xfffffffe msp: 0xfffffffc
> flash write_bank 0 ./src/build/gnuk.bin 0
wrote 115712 bytes from file ./src/build/gnuk.bin to flash bank 0 at offset 0x00000000 in 3.776280s (29.924 KiB/s)
> reset
The device identified to PC as Gnuk!
3011.693402] usb 2-3: New USB device found, idVendor=234b, idProduct=0000
[ 3011.693406] usb 2-3: New USB device strings: Mfr=1, Product=2, SerialNumber=3
[ 3011.693408] usb 2-3: Product: Gnuk Token
[ 3011.693410] usb 2-3: Manufacturer: Free Software Initiative of Japan
[ 3011.693412] usb 2-3: SerialNumber: FSIJ-1.2.4-67055638
After some brief tests it was clear that it works.
Physical button
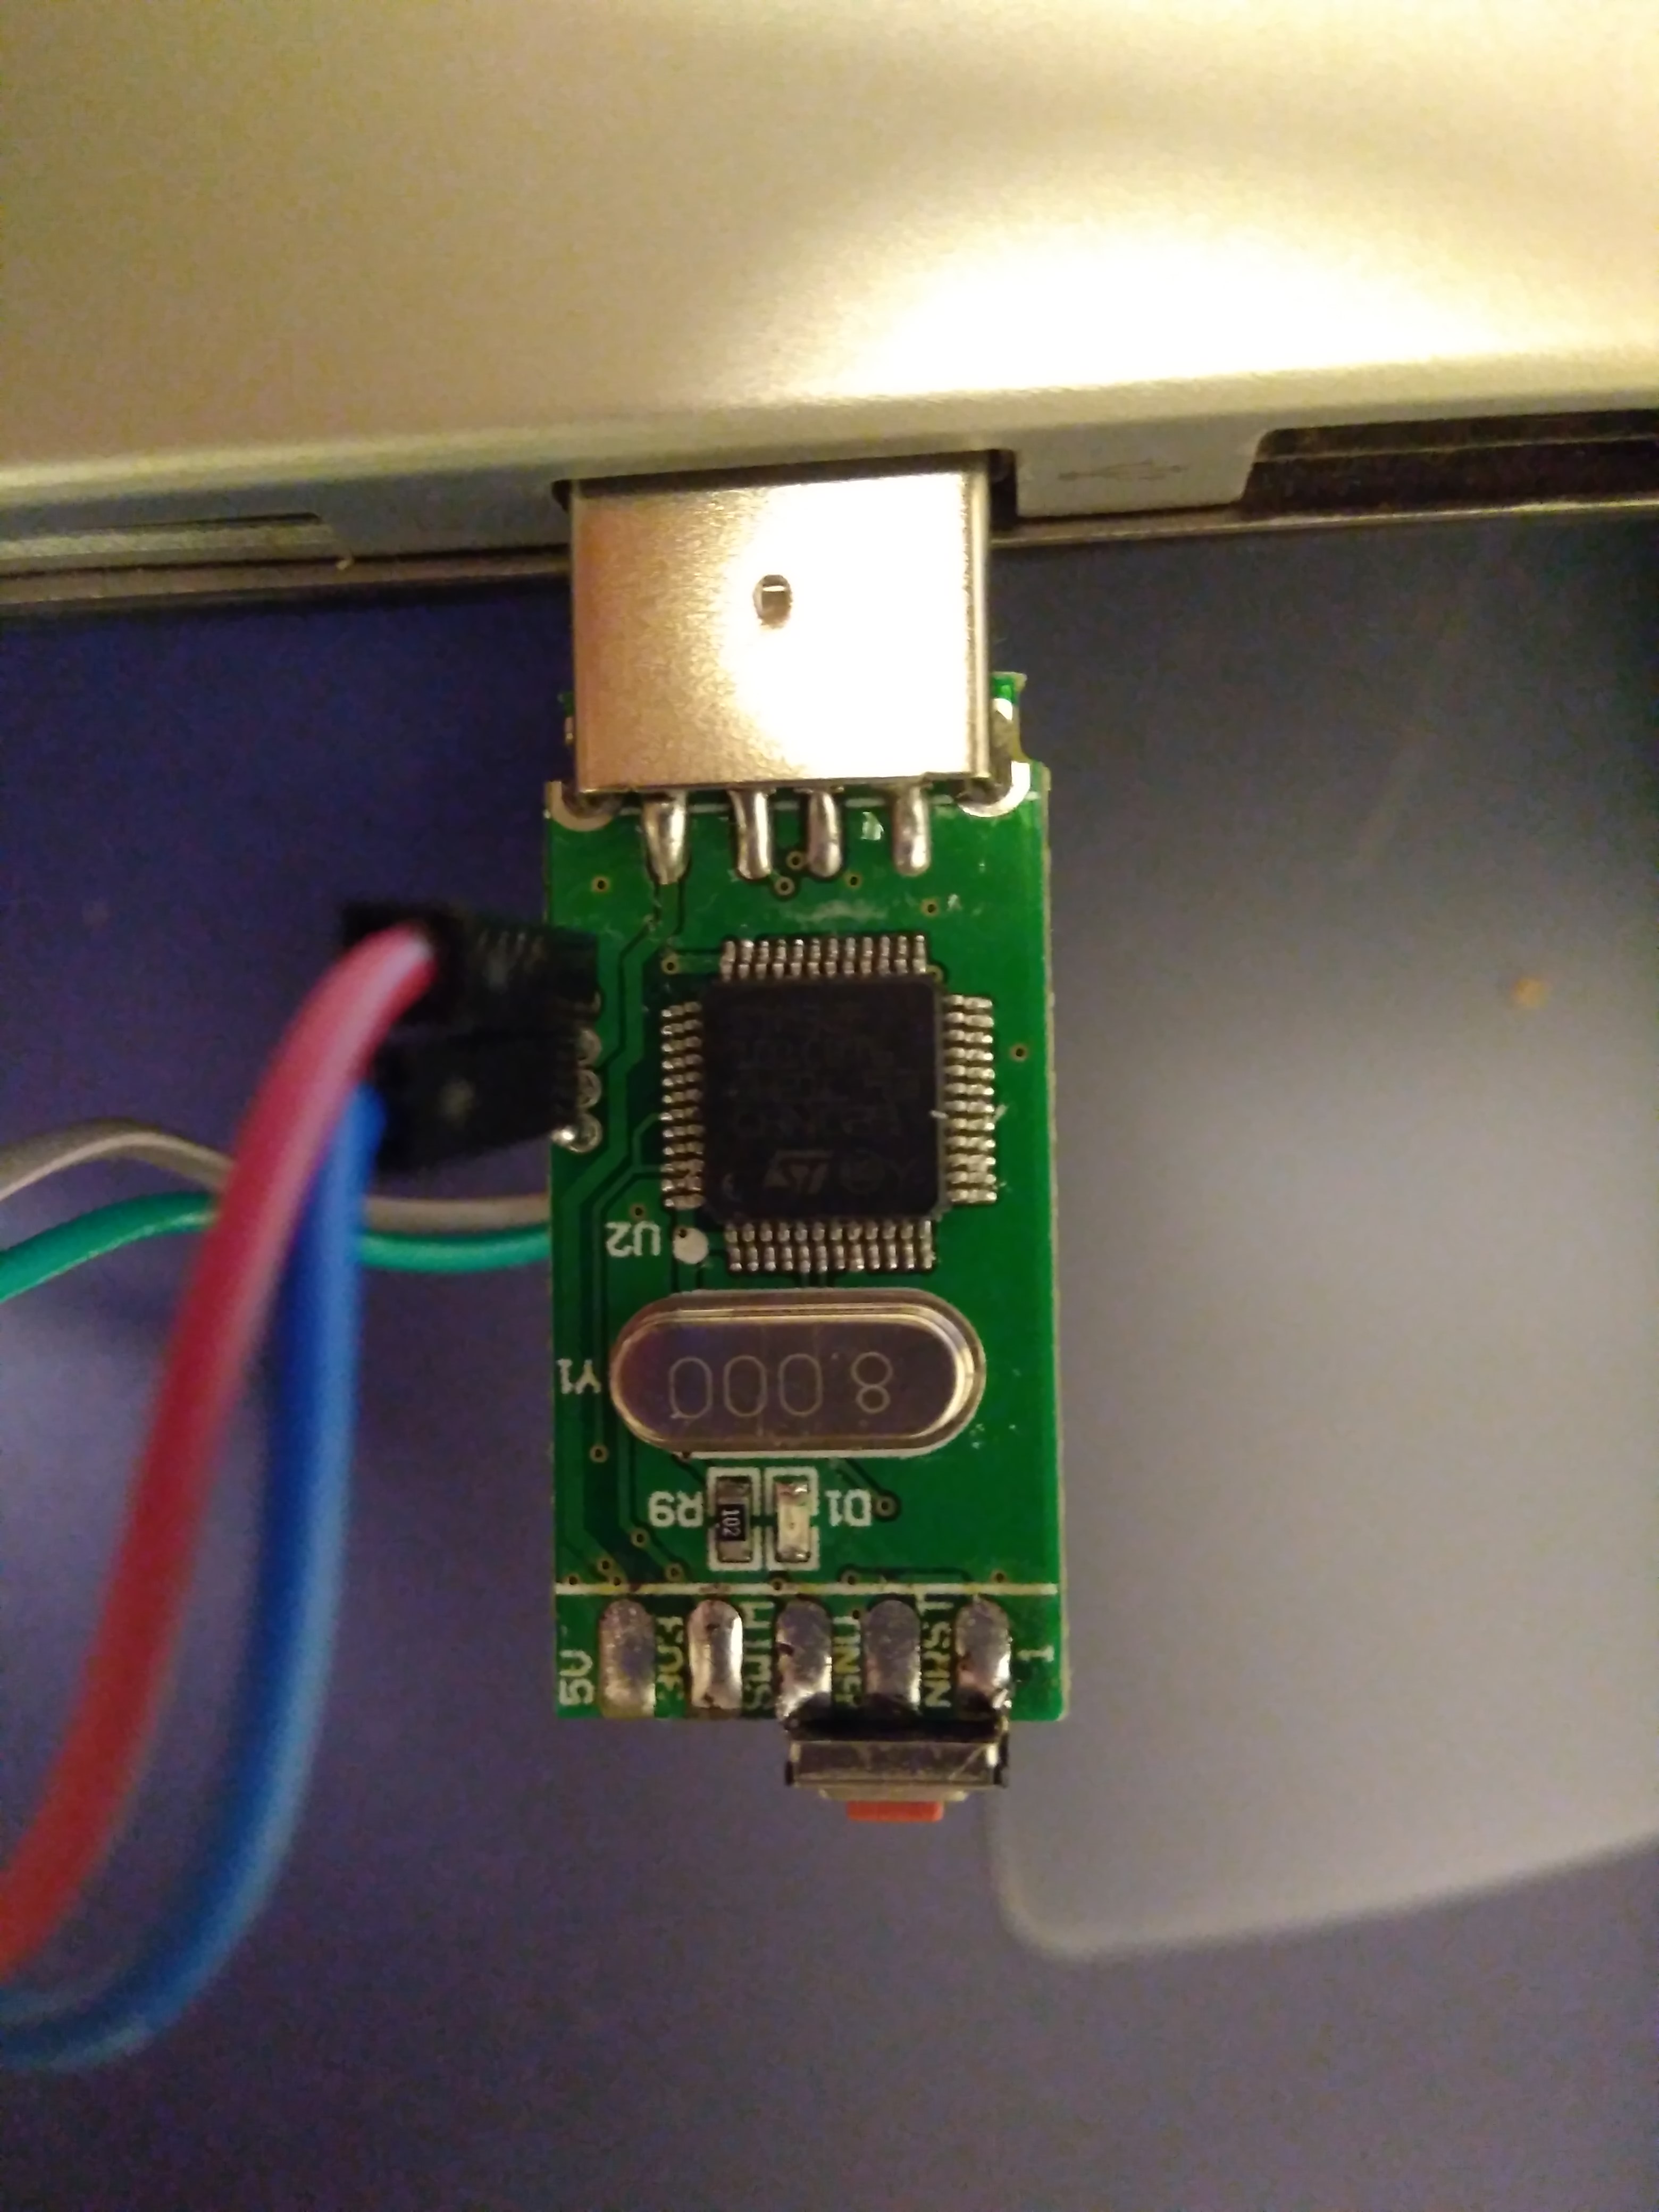
This was nice but I wanted to push it further – I wanted to implement HW button to confirm crypto operations. For this I used the breakout IO pins. First I used just some jumper wires to test my patches to gnuk:
When I was happy with the function I was going to add a real button, so I desoldered the pin header.
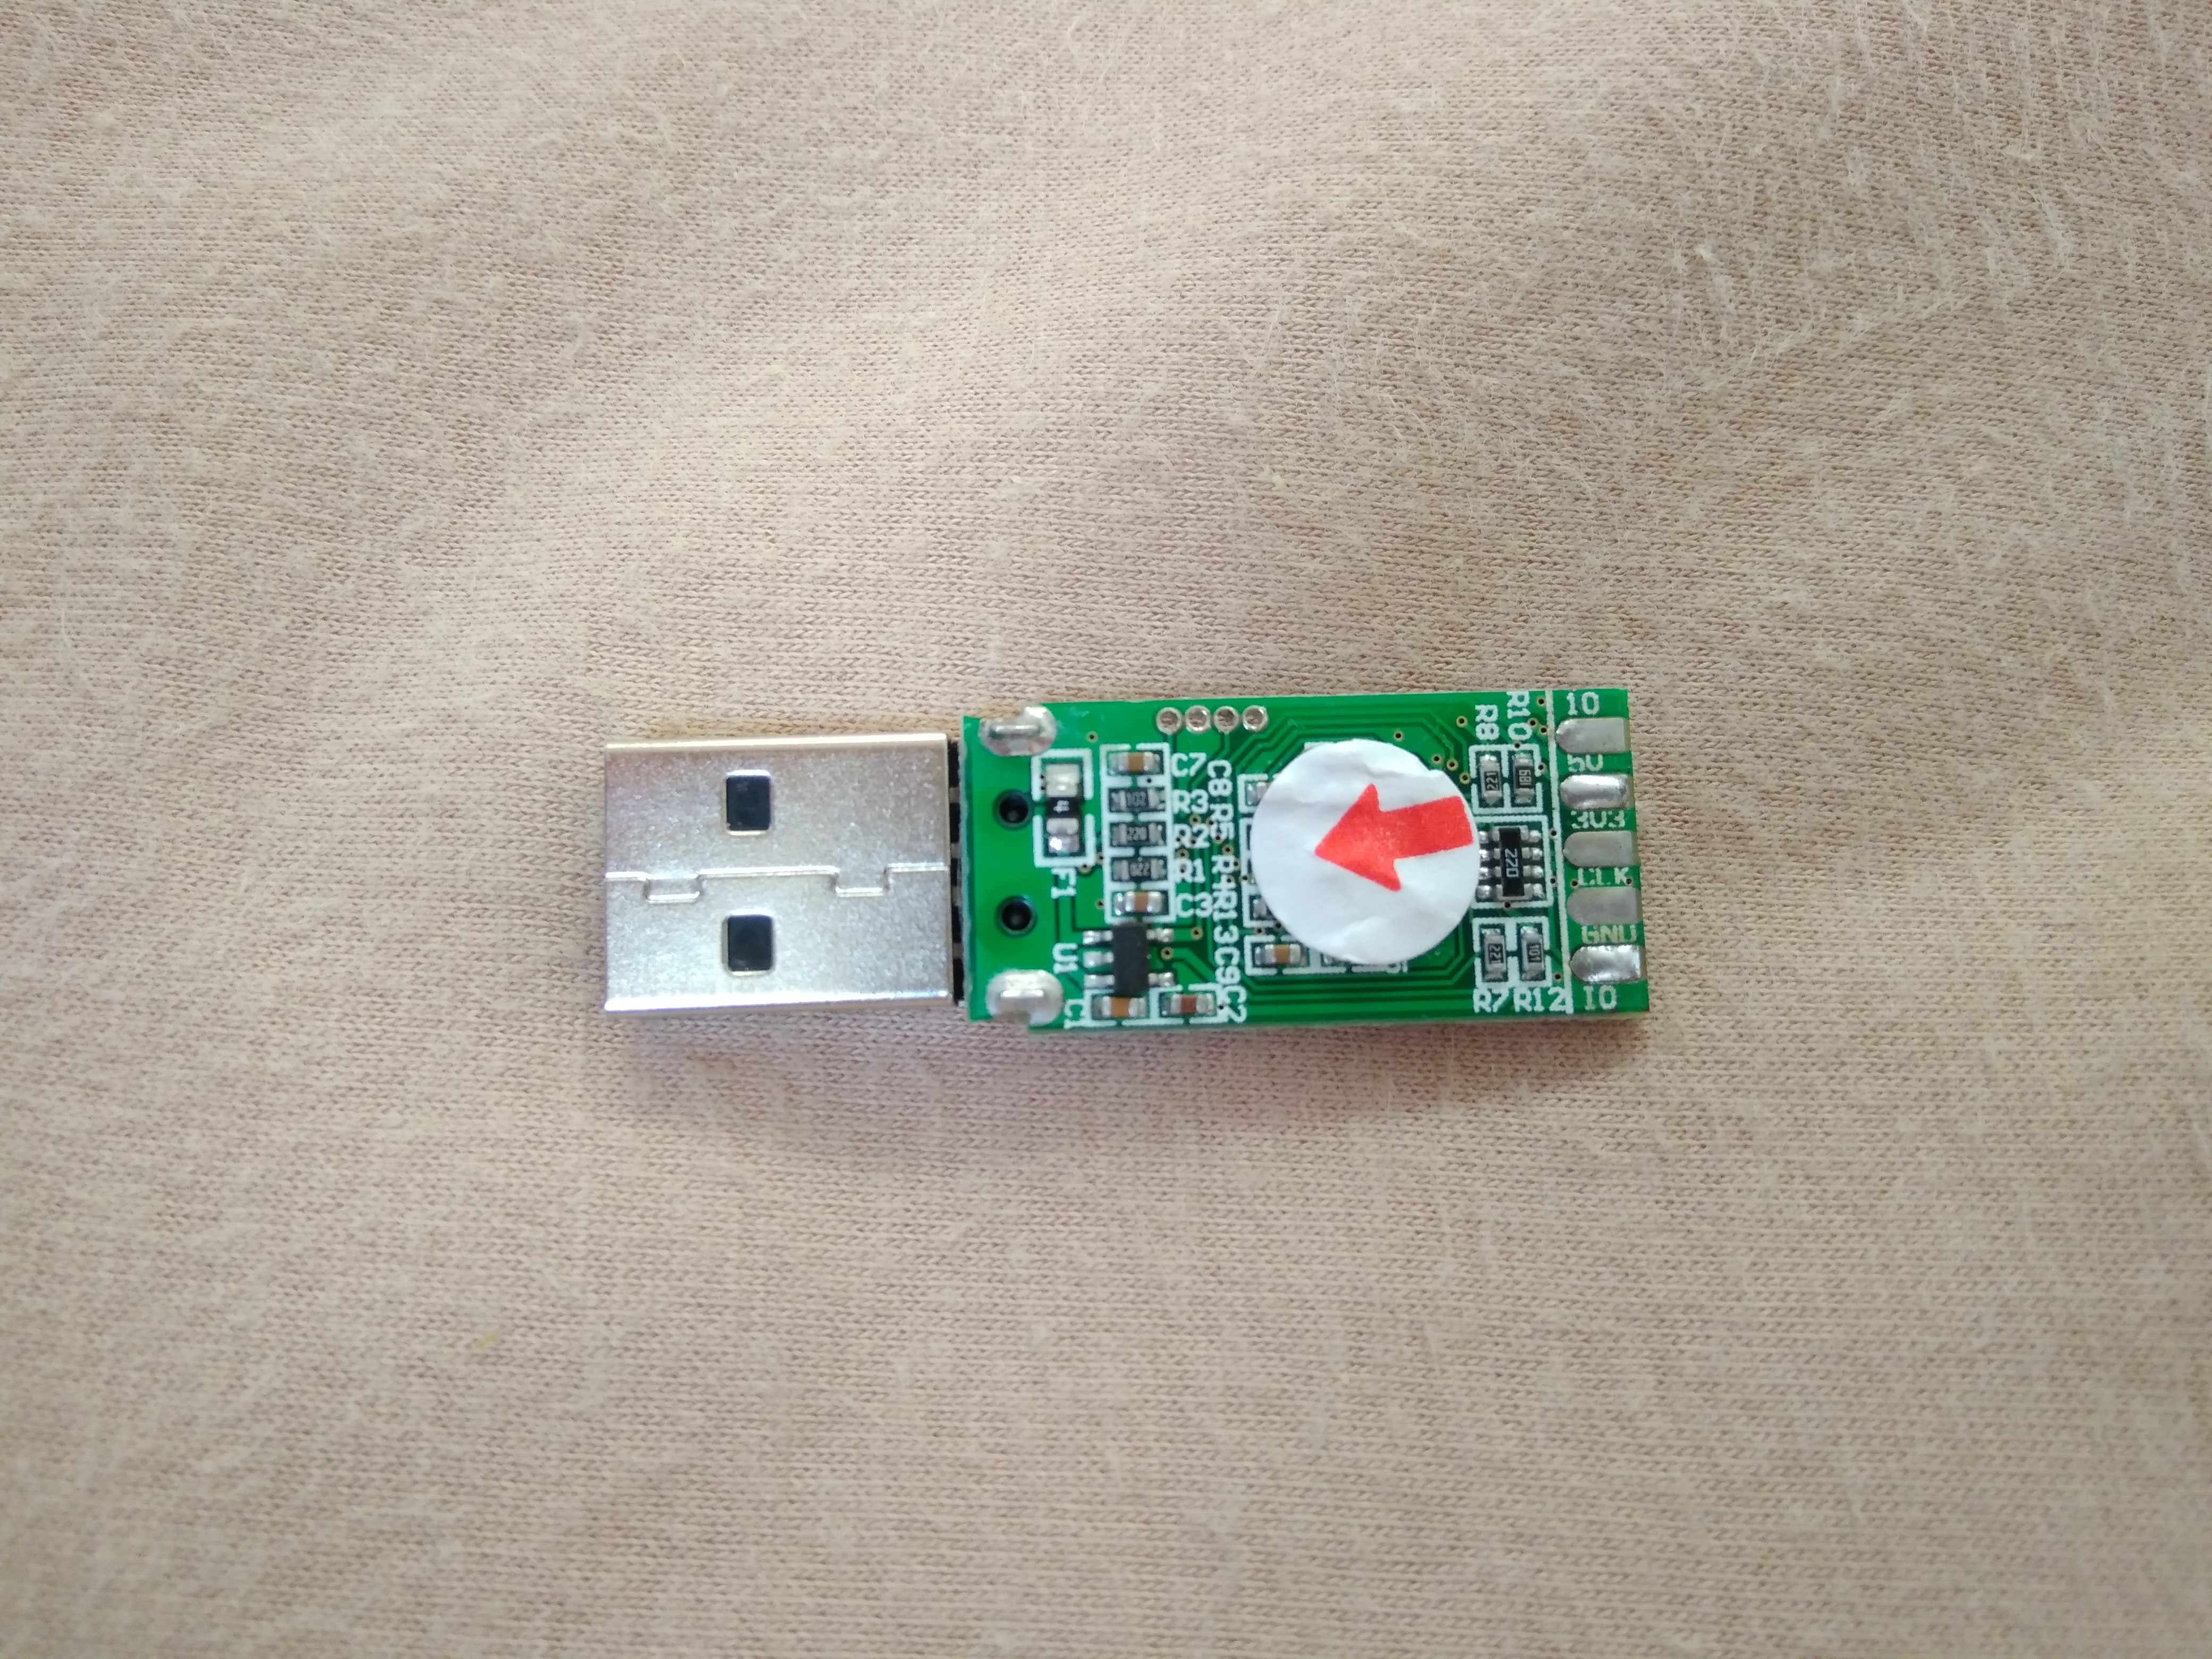
I’ve had some PCB button at hand and I wanted to solder it directly to the edge of the board. For this I needed one IO pin which will be in the right distance from GND pin. Unfortunately there no such pin. So as a workaround, I soldered the button between two IO pins (NRST, SWIM) and I set one of them (SWIM) to zero by firmware.
Now I have USB GPG token which is small, looks nice and have desired features.
 You can download my patches here gnuk-button.
Software
Now lets see how the whole thing works with SSH. You can get more info on these sites:
- https://www.linode.com/docs/security/gpg-key-for-ssh-authentication
- https://help.github.com/articles/generating-a-new-gpg-key/
- https://www.jfry.me/articles/2015/gpg-smartcard/
- https://raymii.org/s/articles/Nitrokey_Start_Getting_started_guide.html
- https://www.gnupg.org/howtos/card-howto/en/ch03.html
I’m going to provide just some crash-course here.
- disable pcscd
$ sudo systemctl disable pcscd
Synchronizing state of pcscd.service with SysV service script with /lib/systemd/systemd-sysv-install.
Executing: /lib/systemd/systemd-sysv-install disable pcscd
Removed /etc/systemd/system/sockets.target.wants/pcscd.socket.
- install packages:
$ sudo apt-get install opensc pcscd paperkey haveged gnupg2 gnupg-agent pinentry-curses libccid scdaemon libksba8 libpth20
- check token info
$ gpg --card-status

Reader ...........: 234B:0000:FSIJ-1.2.4-67055638:0
Application ID ...: D276000124010200FFFE670556380000
Version ..........: 2.0
Manufacturer .....: unmanaged S/N range
Serial number ....: 67055638
Name of cardholder: [not set]
Language prefs ...: [not set]
Sex ..............: unspecified
URL of public key : [not set]
Login data .......: [not set]
Signature PIN ....: forced
Key attributes ...: rsa2048 rsa2048 rsa2048
Max. PIN lengths .: 127 127 127
PIN retry counter : 3 3 3
Signature counter : 0
Signature key ....: [none]
Encryption key....: [none]
Authentication key: [none]
General key info..: [none]
- generate keys on token (private key never leaves token)
$ gpg --card-edit

gpg/card> admin
Admin commands are allowed

gpg/card> generate
Make off-card backup of encryption key? (Y/n) n
Please note that the factory settings of the PINs are
 PIN = '123456' Admin PIN = '12345678'
You should change them using the command --change-pin

What keysize do you want for the Signature key? (2048)
What keysize do you want for the Encryption key? (2048)
What keysize do you want for the Authentication key? (2048)
Please specify how long the key should be valid.
 0 = key does not expire
 <n> = key expires in n days
 <n>w = key expires in n weeks
 <n>m = key expires in n months
 <n>y = key expires in n years
Key is valid for? (0)
Key does not expire at all
Is this correct? (y/N) y

GnuPG needs to construct a user ID to identify your key.

Real name: Igor Timko
Email address:
Comment:
You selected this USER-ID:
 "Igor Timko"

Change (N)ame, (C)omment, (E)mail or (O)kay/(Q)uit? o

...this will take about 5 min and no progress is shown instead of shining LED on token...

gpg: key F0A5780AA5B8E99F marked as ultimately trusted
gpg: revocation certificate stored as '/home/danman/.gnupg/openpgp-revocs.d/322A0733037B0B3854A4959EF0A5780AA5B8E99F.rev'
public and secret key created and signed.
gpg/card> quit
pub rsa2048 2017-08-01 [SC]
 322A0733037B0B3854A4959EF0A5780AA5B8E99F
uid Igor Timko
sub rsa2048 2017-08-01 [A]
sub rsa2048 2017-08-01 [E]
- create or edit ~/.gnupg/gpg-agent.conf
default-cache-ttl 600
max-cache-ttl 7200
enable-ssh-support
- (re)start gpg-agent
$ killall -9 gpg-agent ; gpg-agent --daemon

SSH_AUTH_SOCK=/run/user/1000/gnupg/S.gpg-agent.ssh; export SSH_AUTH_SOCK;
- add this line into your ~/.bashrc
SSH_AUTH_SOCK=/run/user/1000/gnupg/S.gpg-agent.ssh; export SSH_AUTH_SOCK;
- open new shell and list your key
$ ssh-add -L

ssh-rsa AAAAB3NzaC1yc2EAAAADAQABAAABAQCzKNLGBEjXxFVrKS5/ivBMBjfnCJn404bUpoHFbhUXiuIyklWSwc6uhA+HO3pLvQPESkN834DYEy4uJoJIdzKOIBia+JtgtWOItKWVIvd90QThYsVtPdEYpbiMLS/hJ7BrFOuJ2A0L9sPPm9+8QiOZtXc5Qv5E6ua1skn6whwPxSx4QFqVL9TQ7pAxYusDGVmdPwUMSJyKj0sICPGYJBb+PSGa3KuDV3O53keJMj0SaLlVrruBeTUZXNsZ44s58g8TEC6hrKDPoZCxNyGf3l97iX2a0BB8HbmjXSyaaMQyHye09ITeQTAZqArxLxYd21m82iO+d2or9K4y/7S/DD/5 cardno:FFFE67055638
- Now you can add this key to your server and try to log-in.
If you have applied my patch with button, ssh starts logging in and then LED on your token starts to flash quickly. Now you have to press button on token to confirm authentication. You can see it on this video:
Feel free to ask any questions or comment.
Bye!
I saw this article a few weeks ago and ordered two of these dongles almost immediately. They arrived today and I plan to get my hands dirty and test your project in a few days. One thing I noticed while setting up the code to compile is that the repos of gnuk and chopstx are a bit ahead and your code now has some limited “patcheability”. I’d suggest that instead of making the patches available, set up a repository with them already applied. This way everyone taking advantage of this wonderful discover can get the functionality you implemented and also receive the latest fixes for the original code. Nice work. Thank you!
I wanted to include it in upstream but NIIBE doesn’t like this way of confirmation. Let me know if it worked for you.
I think that keeping it as a fork is pretty fair for now. Anyway, I’ll try to merge your patches. Cheers.
Nice post! I’ve made a U2F firmware which can run on these boards. You can check it out here: https://github.com/gl-sergei/u2f-token
You did a good job detailing this post to a level, when even a novice can reproduce this project. I have ordered a pair of this tokens and successfully flashed the firmware.
Here is some tweaks that I had to do.
1) I have used this configuration for openocd:
telnet_port 4444
source [find interface/stlink-v2.cfg]
source [find target/stm32f1x.cfg]
2) openocd was giving me an error:
Error: jtag status contains invalid mode value – communication failure
To fix this just plug in both programmer and token to usb when flashing.
3) Next flashes require erasing memory
flash erase_sector 0 last
4) patch could be applied still (12 dec 2017, revision c81544fffd2f89cb3cf1b791fe7adf21c75200ad)
5) Button confirmation doesn’t work for me. The LED is flashing, but shorting pins RST and SWIM makes no effect (RST to GND didn’t work either)
6) If you wish to remove keys from token, you can use tool/gnuk_remove_keys_libusb.py from gnuk.
Don’t forget to kill gpg-agent/scdaemon etc (whatever could be using the usb device).
Thanks for your notes sarg.
ad 5) : which operation caused the LED to blink? key generation or authentication?
It was authentication. Key generation was way too slow (I have waited 10 minutes without success), so I have ended with generating key on my PC.
Btw, do you think it is a good idea to add some timeout to wait_button function?
It is possible but I think that it makes no sense.
I’m currently stuck with this. I’m using a SL-Link V2 programmer to flash another one.
My openocd config is:
telnet_port 4444
gdb_port 3333
source [find interface/stlink-v2.cfg]
set WORKAREASIZE 0x10000
transport select “hla_swd”
source [find target/stm32f1x.cfg]
Flashing works fine but lsusb reports
Bus 003 Device 007: ID 0000:0000
and usb-devices
T: Bus=03 Lev=01 Prnt=01 Port=01 Cnt=01 Dev#= 14 Spd=12 MxCh= 0
D: Ver= 2.00 Cls=00(>ifc ) Sub=00 Prot=00 MxPS=64 #Cfgs= 1
P: Vendor=0000 ProdID=0000 Rev=00.00
S: Manufacturer=Free Software Initiative of Japan
S: Product=Gnuk Token
S: SerialNumber=FSIJ-1.2.8-87014124
C: #Ifs= 1 Cfg#= 1 Atr=80 MxPwr=100mA
I: If#=0x0 Alt= 0 #EPs= 3 Cls=0b(scard) Sub=00 Prot=00 Driver=(none)
So it seems that the flashing worked, but the vendor id was not set.
I ran ./configure –vidpid=234b:0000 –target=ST_DONGLE so it should be there.
When I flashed the latest gnu.bin I got the following:
flash write_bank 0 /home/user/gnuk/src/build/gnuk.bin 0
target halted due to breakpoint, current mode: Thread
xPSR: 0x61000000 pc: 0x2000003a msp: 0x20005000
wrote 111616 bytes from file /home/user/gnuk/src/build/gnuk.bin to flash bank 0 at offset 0x00000000 in 3.619718s (30.113 KiB/s)
What can I do to get this working?
Hello, try running:
> reset halt
> stm32f1x mass_erase 0
> flash write_bank 0 /home/user/gnuk/src/build/gnuk.bin 0
Still doesn’t work. Can you share a working version of gnuk.bin?
Now dmesg shows now, after erased the chip reset and tried to reflash it:
[ 32.370362] usb 3-6: Device not responding to setup address.
[ 32.590349] usb 3-6: Device not responding to setup address.
[ 32.810142] usb 3-6: device not accepting address 7, error -71
[ 32.810178] usb usb3-port6: unable to enumerate USB device
I tired also to flash the gnuk.bin with stlink. The flashing itself worked, but same issue still exists.
I don’t know if the cheap ST-Link V2 flasher is the problem or something else, because I currently only have this one.
Ok with the help of danman i figured it out.
tl;dr: run make build/gnuk-vidpid.elf and flash gnuk-vidpid.bin instead of gnuk.bin
Here is the way to flash the latest version of gnuk with a ST-Link V2 on a ST-Link V2.
1. compile gnuk
git clone git://anonscm.debian.org/gnuk/gnuk/gnuk.git
cd gnuk
git submodule update –init
cd src
./configure –vidpid=234b:0000 –target=ST_DONGL
make
make build/gnuk-vidpid.elf
2. unlock ST-Link V2 that we want to flash gnuk on
My openocd config:
telnet_port 4444
source [find interface/stlink-v2.cfg]
set WORKAREASIZE 0x1000
transport select “hla_swd”
source [find target/stm32f1x.cfg]
reset_config none
Now run openocd and connect to it via telnet as above. Follow it but leave out the flash step, because I used stlink(https://github.com/texane/stlink) for flashing, but it might work.
If you have issues flashing something new you can also add this commands:
reset halt
flash protect 0 0 127 off
This worked for me and I found it here: http://www.openstm32.org/forumthread2221#threadId2226
3. flash gnuk
Connect your ST-Link V2 as shown in the post and run:
sudo st-flash write build/gnuk-vidpid.bin 0x8000000
Now you should have a working version that you can test if it is detected with usb-devices under Linux. The output should look something like this:
T: Bus=03 Lev=01 Prnt=01 Port=01 Cnt=01 Dev#= 40 Spd=12 MxCh= 0
D: Ver= 2.00 Cls=00(>ifc ) Sub=00 Prot=00 MxPS=64 #Cfgs= 1
P: Vendor=234b ProdID=0000 Rev=02.00
S: Manufacturer=Free Software Initiative of Japan
S: Product=Gnuk Token
S: SerialNumber=FSIJ-1.2.8-87014124
C: #Ifs= 1 Cfg#= 1 Atr=80 MxPwr=100mA
I: If#=0x0 Alt= 0 #EPs= 3 Cls=0b(scard) Sub=00 Prot=00 Driver=(none)
Hi danman,
I programmed gnuk on the key, but as soon as it got written, I could not connect to the key anymore…
Now I’m wondering how to upgrade for example.
When I try to connect I get this :
—
Info : auto-selecting first available session transport “hla_swd”. To override use ‘transport select ‘.
Info : The selected transport took over low-level target control. The results might differ compared to plain JTAG/SWD
adapter speed: 1000 kHz
adapter_nsrst_delay: 100
none separate
srst_only separate srst_nogate srst_open_drain connect_assert_srst
Info : Unable to match requested speed 1000 kHz, using 950 kHz
Info : Unable to match requested speed 1000 kHz, using 950 kHz
Info : clock speed 950 kHz
Info : STLINK v2 JTAG v21 API v2 SWIM v4 VID 0x0483 PID 0x3748
Info : using stlink api v2
Info : Target voltage: 3.260766
Error: jtag status contains invalid mode value – communication failure
Polling target stm32f1x.cpu failed, trying to reexamine
Examination failed, GDB will be halted. Polling again in 100ms
Info : Previous state query failed, trying to reconnect
Error: jtag status contains invalid mode value – communication failure
Polling target stm32f1x.cpu failed, trying to reexamine
Examination failed, GDB will be halted. Polling again in 300ms
Info : Previous state query failed, trying to reconnect
Error: jtag status contains invalid mode value – communication failure
—
Do you know what to do ? What’s needed to erase/write a programmed flash ?
On some web sites, they talk about being able to use the SWD RST which is not available on those cheap clones. I tried looping “openocd” and unplugging/replugging the programming key without success.
You guys seem to erase sometimes ; I’m not sure that’s done in the same situation…
Tips and tracks to dig would be very welcome.
Also, thanks a lot for sharing about those cheap keys, that makes very affordable tokens!
F.
For me, the connection worked everytime. I have no idea what could help you. Perhaps there’s a way how to trigger SWD RST manually?
I had a similar issue with flashing back from the Arduino firmware to gnuk.
I solved this by:
1. only connecting SWCLK and SWDIO
2. Start openocd with your command and plug the ST-Link V2 in a usb port at the same time
3. connect immediately to telnet and send “reset halt” and then flashing worked normally.
Maybe this helps.
The ST-Link V2 I got doesn’t seem to have enough flash to handle the gnuk image:
> flash banks
#0 : stm32f1x.flash (stm32f1x) at 0x08000000, size 0x00010000, buswidth 0, chipwidth 0
0x10000 is 65536 in decimal.
$ ls -l build/gnuk-vidpid.bin
-rwxrwxr-x 1 martin martin 111616 Feb 25 21:23 build/gnuk-vidpid.bin
111616 > 65536
I’m going to look into building a smaller gnuk image, but there may be different ST-Link sticks to buy.
Hi Martin,
can you please share a photo of your device with readable chip markings?
Huh. Nope. Unless by “chip markings” you mean the weird, striated etchings on the back of the chip where I would expect to see any identifier.
https://photos.app.goo.gl/WeR6N0F1GkbfyHjR2
I found out my chip has 128kB flash. But wow! I wonder why do they sand the markings down on your version.
First of all thank you for this wonderful project!
I’ve build several gnuk tokens before but the STLink clones seem to be quite nice as they already come with a case. Thanks for sharing this information!
The stlink clones arrived and I was eager, to try to install a gnuk.bin to them. However the target board cannot be detected. My main workstation is a macbook so I use a VM to work with this, however I also tested with a plain Linux box with the same results.
While I was troubleshooting, I tried to document all the steps so that it becomes reproduceable:
https://www.dropbox.com/s/z7h2nx24ycbti50/Debug%20ST-Link%20Issues%20%5B180322%20backup%20docs%20perm%20public%20websites%5D.html?dl=0
Can you see any obvious mistakes? If you have multiple STlinks yourself, I would greatly appreciate when you could create a follow up article describing how to use one stlink to flash another.
Seems like several folks followed your guide already and I am not sure whether one needs better JTAG programmer to repurpose the stlinks 🙂
Hello redtux,
I do it like on the first picture here: https://blog.danman.eu/st-link-clone-as-stm32-dev-board/ . I only connect SWDIO and SWCLK because GND is common for all USBs and Vcc is suplied from onboard regulator.
Found the issue. SWCLK was not well connected. However seems like the vendors learned that the stlinks get repurpossed. Seems like they set the Device Security Bit in level 2 that cannot be undone.
https://pastebin.com/raw/RkhWxA2F
Shows that it got unlocked. But flashing fails. I’ve also tried the Windows ST Link Utility that also complained about the Device Protection and said that it will automatically remove it. But it does not work either way.
🙁
You are probably right, if it is really locked with Level 2, it cannot be unlocked:
http://www.st.com/content/ccc/resource/technical/document/application_note/b4/14/62/81/18/57/48/05/DM00075930.pdf/files/DM00075930.pdf/jcr:content/translations/en.DM00075930.pdf
STM32F1 serial only level 1 protect.
Just use “STM32 ST-LINK Utility” disable protect.
Got it working 🙂
* Updated firmware of stlink to latest upstream version.
* Removed Read Out Protection (it was version 1 only; check it with “C:\Program Files (x86)\STMicroelectronics\STM32 ST-LINK Utility\ST-LINK Utility\ST-LINK_CLI.exe” -c SWD -rOB)
* Built and flashed https://github.com/devanlai/dapboot using ST-LINK Windows Tool
* Erased chip
* Flashed gnuk.bin
* …
* Profit
The device is being reported as a 64kb flash mcu. Only after flashing another bin file, I could flash full 128kB bin without modification of the code (however i looked into it as another user reported problems; seems like current releases cannot easily patched to remove ECC code to fit 64kb)
Learned a lot in the process and again thanks for pointing to this neat device. However Marble Minis (baite) are easier to flash – especially as they do not come with Read Out Protection (and I think they set a flag to have a proprietary protection, as the Linux/GNU tools could not easily revert them).
Thanks for sharing your experience. Maple minis are good choice but they do not come with nice aluminium case and are not so compact. But yes, they are much easier to flash.
Anyone got an aliexpress link to a fitting button like the one used here?
Hi Felix,
this should be the exact same: https://www.aliexpress.com/item/100PCS-3X6X2-5mm-Tactile-Push-Button-Switch-Tact-Switch-Micro-Switch-2-Pin-SMD/32672806661.html
Hi,
Thanks for this nice post.
I’m struck at programming the board. I’ve bought few of these boards. So my plan is to use one to programs others. But I don’t know what to connect with what. Shall I connect SWDIO, GND, SWCLK, 3V3 of the programmer to SWDIO, GND, SWCLK, 3V3 the programmed?
Regards,
Colin Brosseau
Hi Colin,
that’s exactly what you need to do, see the first picture in section Programming. You just replace J-Link with ST-link and that’s it.
On the picture, I don’t understand why the ST-Link is plugged in the USB port of a laptop. I’d expect it to be powered by the wires.
You are right, it’s a bit confusing, it should be disconnected but as soon as the STM32 CPU is halted by debugger it doesn’t matter.
Where do I get the correct st-link?
There seem to be versions with 64K and with 128K but the sellers don’t specify what version of the chip is used on their devices/clones.
Anybody got a link where I can get the 128K version that is verified to be working with this?
hey,
your push request was denied. did you check out the new possibility for a ack button?(https://salsa.debian.org/gnuk-team/gnuk/gnuk/blob/master/src/configure#L47)
@Pablo Any of these stick should be at least the STM32F103C8 and have then 128KB. I bought about twenty from three different reseller and the chips were sufficient. the pcb layout however differs
Hey,
I’ve been tracing the ack button support in the latest commits and can’t for the life of me figure out how to use it. I can see that the button pin is defined under chopstx to be either PA2 or PA3 depending on the board id but it seems like the functionality has been implemented as part of the host token interaction as part of usb-ccid. If that’s the case then it is necessary for the host to request user ack rather than the token being set to use it right?
If anyone has any light on the situation then feel free to reply!
I’ve spent two days trying to get this to work, compiling on Ubuntu 18.04.01 but the device would just not be detected after writing the bin file to it:
[2852075.564929] usb 1-1.3: new full-speed USB device number 23 using ehci-pci
[2852075.644938] usb 1-1.3: device descriptor read/64, error -32
[2852075.832937] usb 1-1.3: device descriptor read/64, error -32
[2852075.941109] usb 1-1-port3: attempt power cycle
I finally found the issue which was due to my compiler – fixed using:
sudo apt-get remove binutils-arm-none-eabi (below install will fail if we leave binutils)
sudo apt-add-repository ppa:team-gcc-arm-embedded/ppa
sudo apt update
sudo apt install gcc-arm-embedded
Now when I compile, my MD5 is different on the bin and all works 🙂
Hello,
Thanks a lot for this great article! The confirmation button was a very valuable addition 🙂
The ST dongle I received had a slightly different design, it’s using an STM32F103CBU6, and the RST and SWIM pins are connected to different GPIO pins. I’ve adapted your patch to this model for the latest Gnuk release and documented everything in case someone else has the same model.
https://gist.github.com/rot42/cd6ff46be45f0b7d7cd461a7bcc14d79
Very nice, thank you!
Will GnuK work and generate keys if flash is fully protected to disallow read-out?
Without Level 2 protection it could not be considered HSM 🙁
If I understand the docs, it should work.
https://www.st.com/content/ccc/resource/technical/document/application_note/89/12/c5/e2/0d/0e/45/7f/DM00186528.pdf/files/DM00186528.pdf/jcr:content/translations/en.DM00186528.pdf
Hello!
Does it possible to sign something by this token? I pushed subkey [S] to token. Now, I want to sign a small file by this subkey.
gpg2 –sign file.txt
It promt me for PIN code. I enter the PIN code, and nothing happens. Terminal waits for something, and ST-Link just blinking red and blue lights. If I interrupt this process by Ctrl+C, I found empty file file.txt.gpg.
Hi,
seems the git URL isn’t valid any more….:
git clone git://anonscm.debian.org/gnuk/gnuk/gnuk.git
Klone nach ‘gnuk’ …
fatal: could not conect to anonscm.debian.org :
anonscm.debian.org[0: 2001:648:2ffc:deb::211:202]: errno=connection refused
anonscm.debian.org[1: 194.177.211.202]: errno=connection refused
But…git clone https://salsa.debian.org/gnuk-team/gnuk/gnuk.git
is working (at least for cloning) Is this the same project or a different one?
thanks a lot!
Check the git history, if you see this, it’s the same:
commit fa69a85826ca030128fa0108221c2a6f773891f2 (tag: release/1.2.4, origin/master, origin/HEAD)Author: NIIBE Yutaka
Date: Fri May 12 17:22:20 2017 +0900
Version 1.2.4.
Signed-off-by: NIIBE Yutaka
I conected to github and ssh server.
Thanks danman.
This looks amazing! One question, what’s is the biggest key size that is usable? Can I use ECC with it? Or can any of the hardware be upgraded?
I’m sorry for all this questions but I know basically nothing about electronics, I want to learn though.